SAM + Stable Diffusion for Text-to-Image Inpainting

In this article, we’ll leverage the power of SAM, the first foundational model for computer vision, along with Stable Diffusion, a popular generative AI tool, to create a text-to-image inpainting pipeline that we’ll track in Comet. Feel free to follow along with the full code tutorial in this Colab and get the Kaggle dataset here.
Or, if you can’t wait, check out the full public project here!
What is SAM?
Earlier this year, Meta AI caused another huge stir in the computer vision community with the release of their new open-source project: the Segment Anything Model (SAM). But, what makes SAM so special?
SAM is a prompt-able segmentation system with results that are simply stunning. It excels in zero-shot generalization to unfamiliar objects and images without the need for additional training. It’s also considered the first foundational model for computer vision, which is big news! We’ll talk a little more about foundational models next.
SAM was trained on a massive dataset of 11 million images with 1.1 billion segmentation masks, which Meta has also released publicly. But perhaps the best way to showcase SAM’s groundbreaking capabilities is with a short demo:

What are foundational models?
Foundation models are neural networks trained on massive unlabeled datasets to handle a wide variety of tasks. These powerful machine learning algorithms power many of the most popular Generative AI tools used today, including ChatGPT and BERT.
Foundation models have made major strides in natural language processing, but until recently, haven’t gained much traction in computer vision applications. That’s because computer vision has struggled to find a task with semantically rich unsupervised pre-training, akin to predicting masked tokens for NLP. With SAM, Meta set out to change this.
How to use SAM
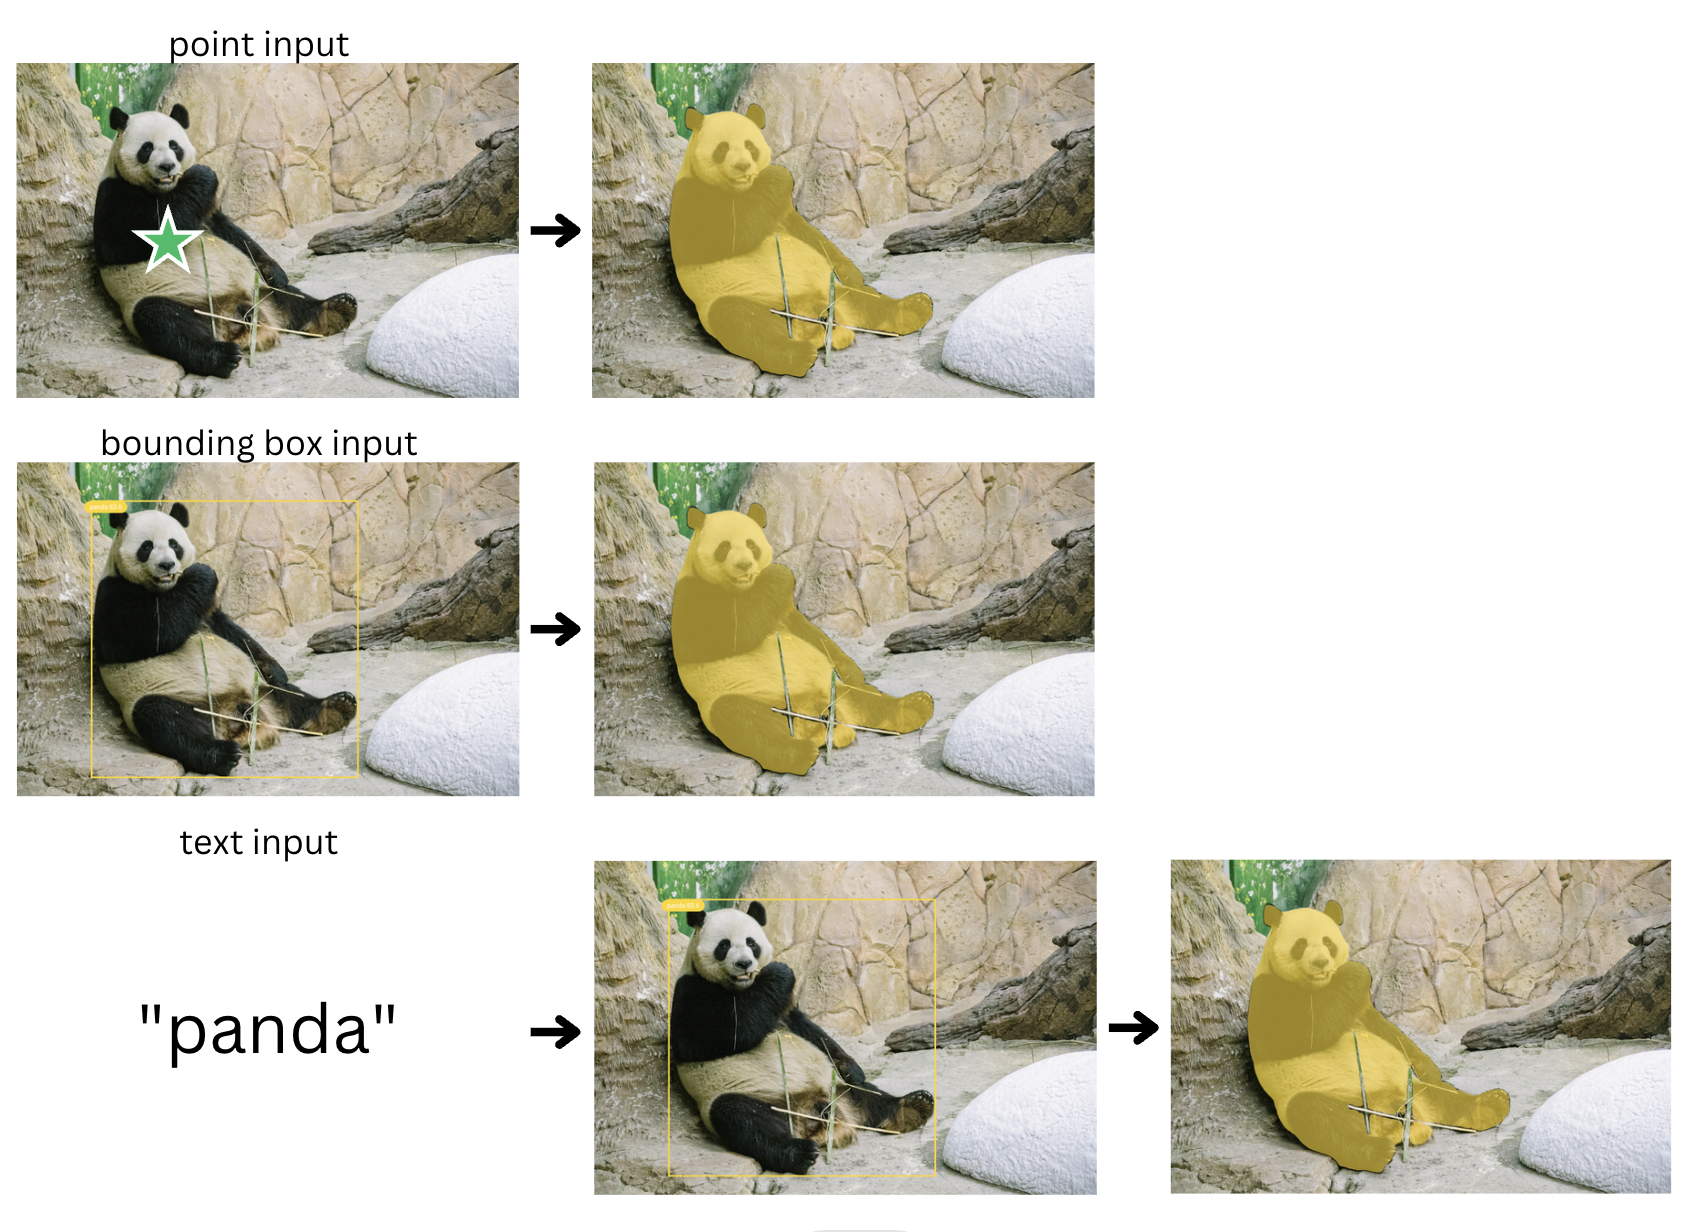
The Segment Anything Model requires no additional training, so all we need to do is provide a prompt that tells the model what to segment in a given input image. SAM accepts a variety of input prompt types, but some of the most common ones include:
- Prompting interactively within a UI
- Prompting programmatically with points or boxes
- Prompting with the bounding box coordinates generated from an object detection model
- Automatically segmenting everything in an image
Project Overview: GroundingDINO + SAM + Stable Diffusion
SAM doesn’t just integrate well with different input types, however. SAM’s output masks can also be used as inputs to other AI systems for even more complicated pipelines! In this tutorial, we’ll demonstrate how to use SAM in conjunction with GroundingDINO and Stable Diffusion to create a pipeline that accepts text as input to perform image inpainting and outpainting with generative AI.
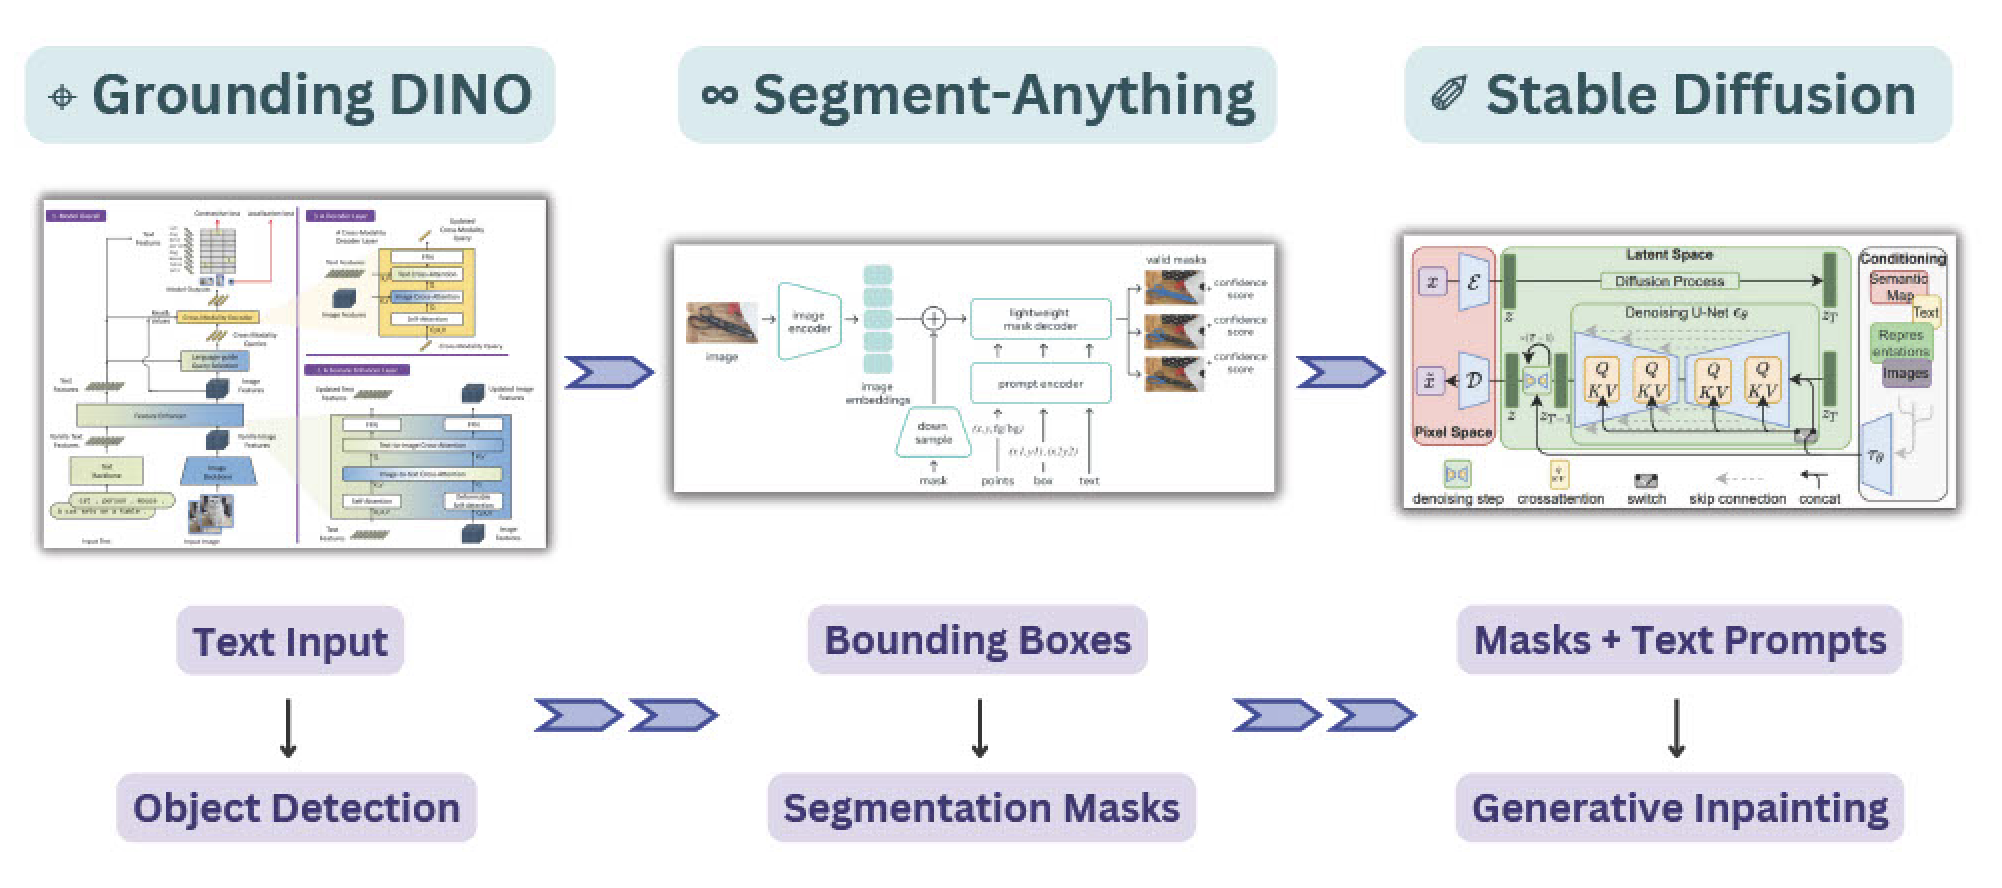
To do this, we’ll be leveraging three separate models. First, we’ll use Grounding DINO to interpret our text input prompt and perform object detection for those input labels. Next, we’ll use SAM to segment the masks within those bounding box predictions. Finally, we’ll use the masks generated from SAM to isolate regions of the image for either inpainting or outpainting with Stable Diffusion. We’ll also use Comet to log the images at each step in the pipeline so we can track exactly how we got from our input image to our output image.
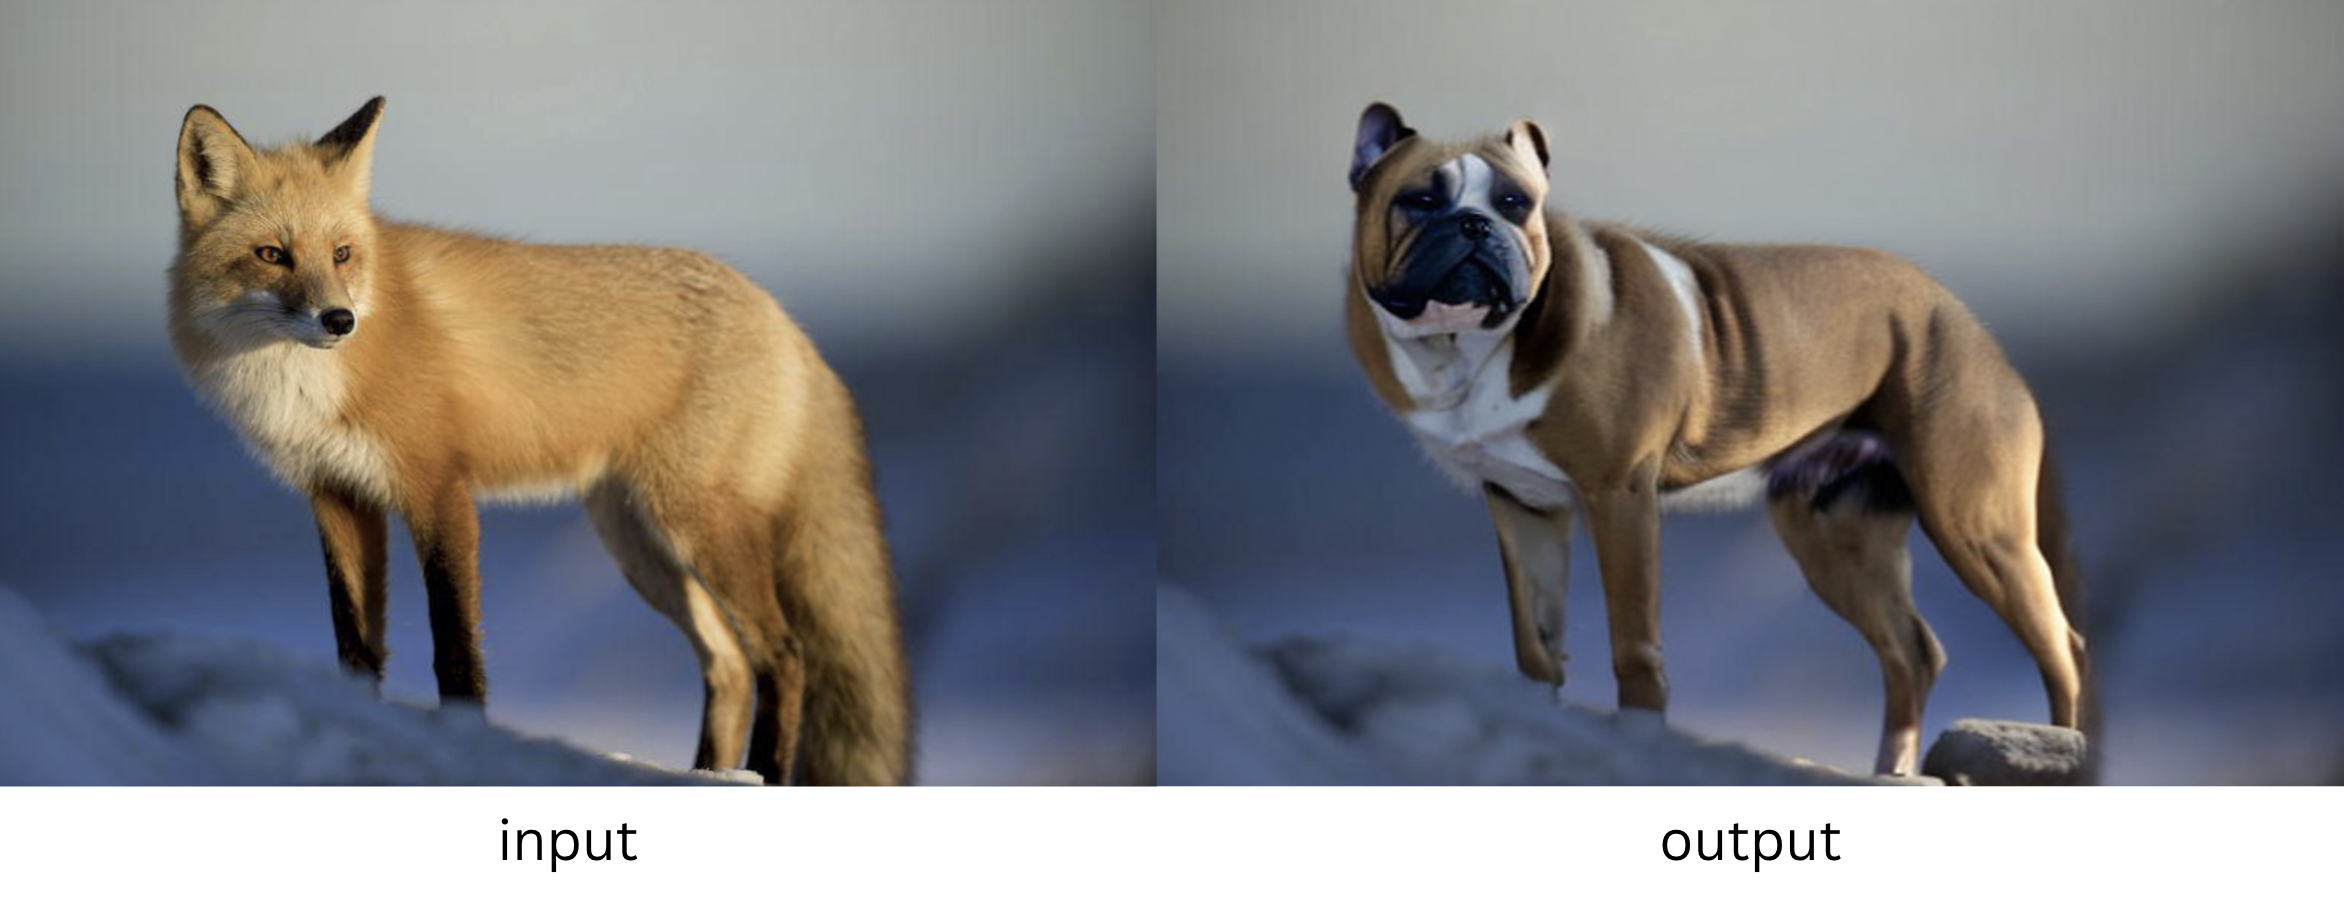
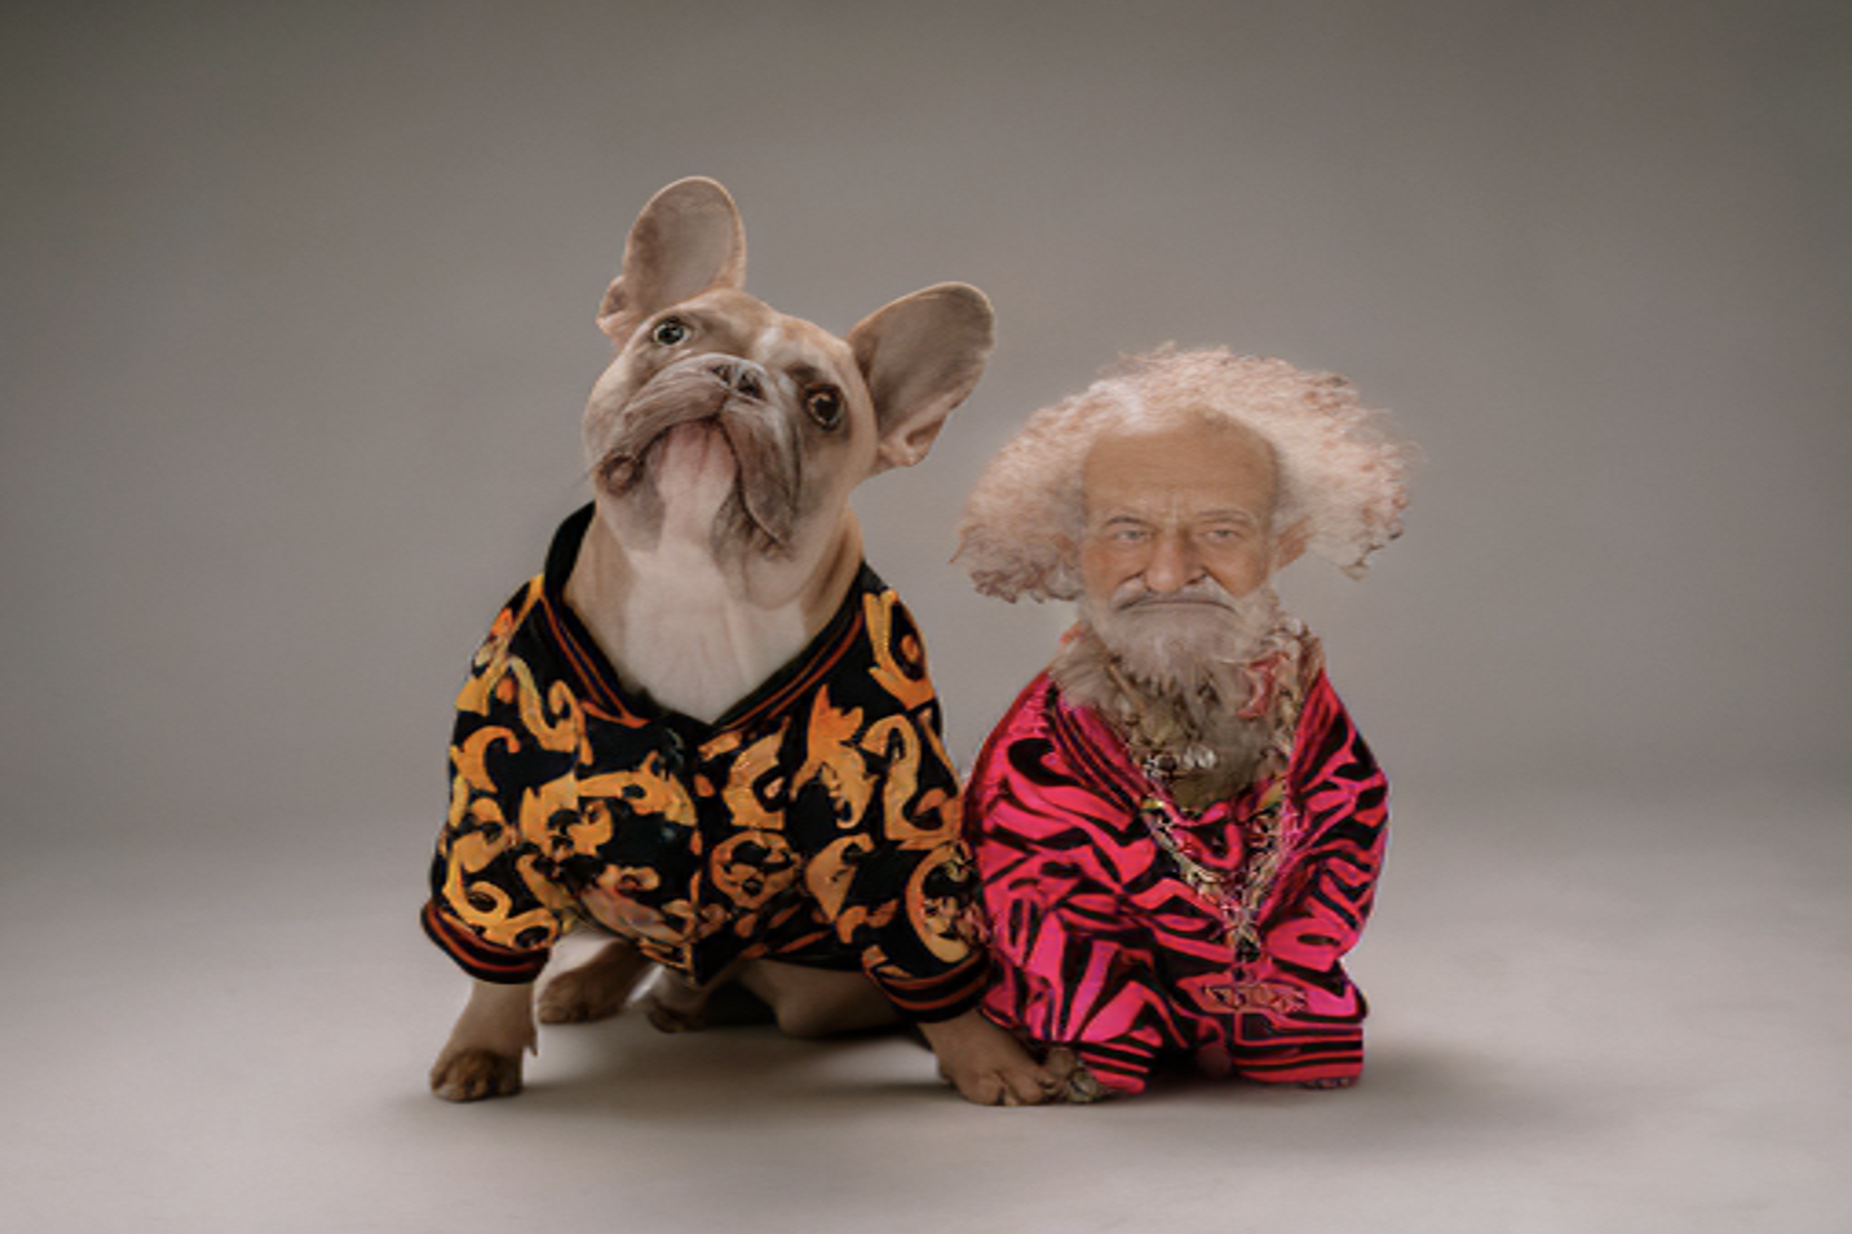
In the end, we should be able to provide an input image, a few input text prompts specifying what we’d like the model to do, and end up with a transformation like the one below:
Object detection with 🦕GroundingDINO
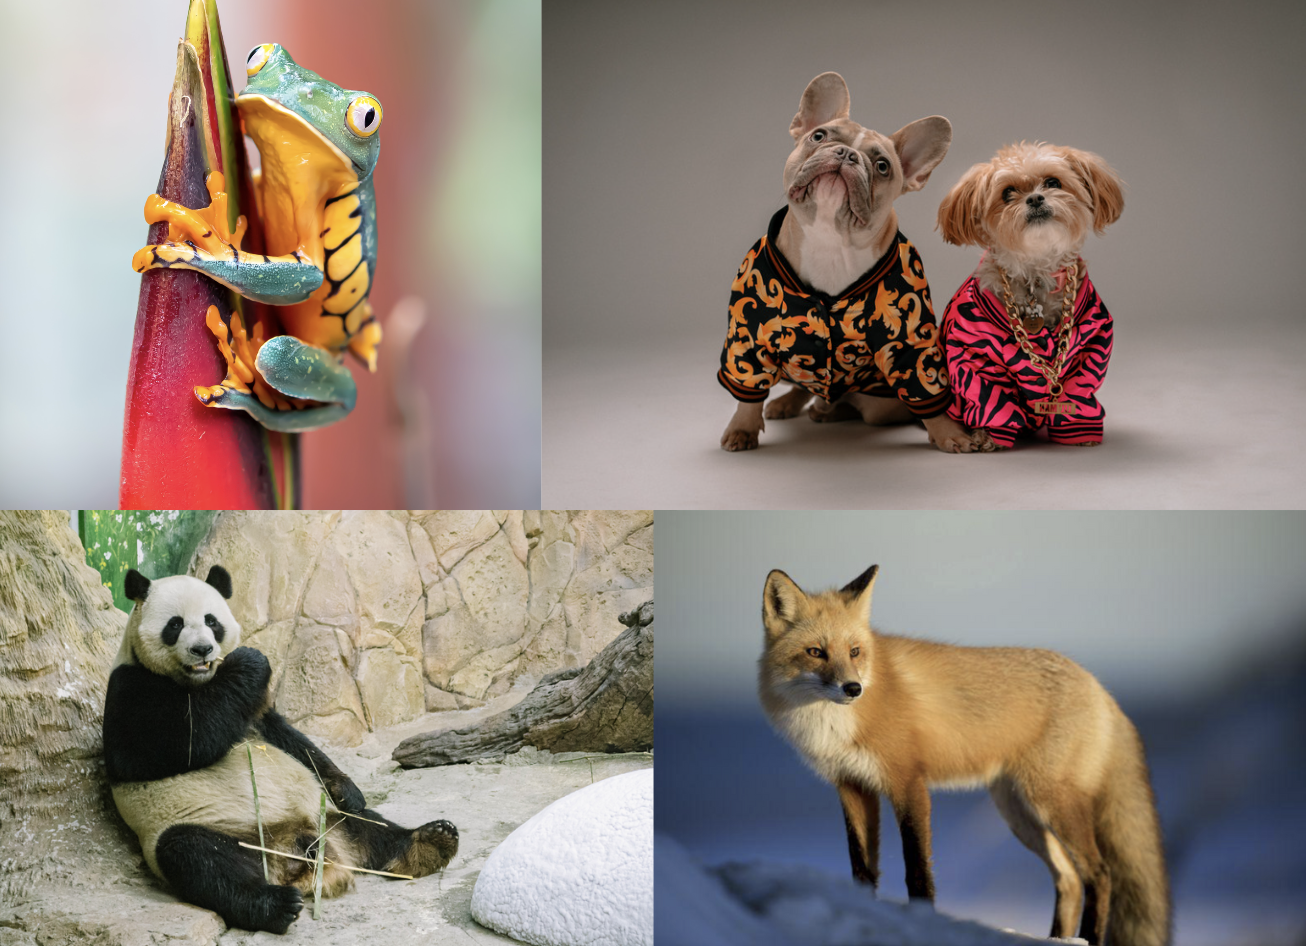
We’ll use four example images in this tutorial, which can be downloaded from Kaggle here. These images were all taken from Unsplash and links to the original photographers can be found at the bottom of this blog.
Once our environment is set up, we start by defining our input image and providing a text prompt that specifies which objects we want to detect. Note the format of the text prompt and make sure to separate each object with a period. We don’t have to choose from any particular categories here, so feel free to experiment with this prompt and add more categories if you’d like.
After some very simple preprocessing, we use the GroundingDINO model to predict bounding boxes for our input labels. We log these results to Comet to examine later. This way we’ll be able to see the images at each step in the pipeline, which will not only help us understand the process, but will also help us debug if anything goes wrong.
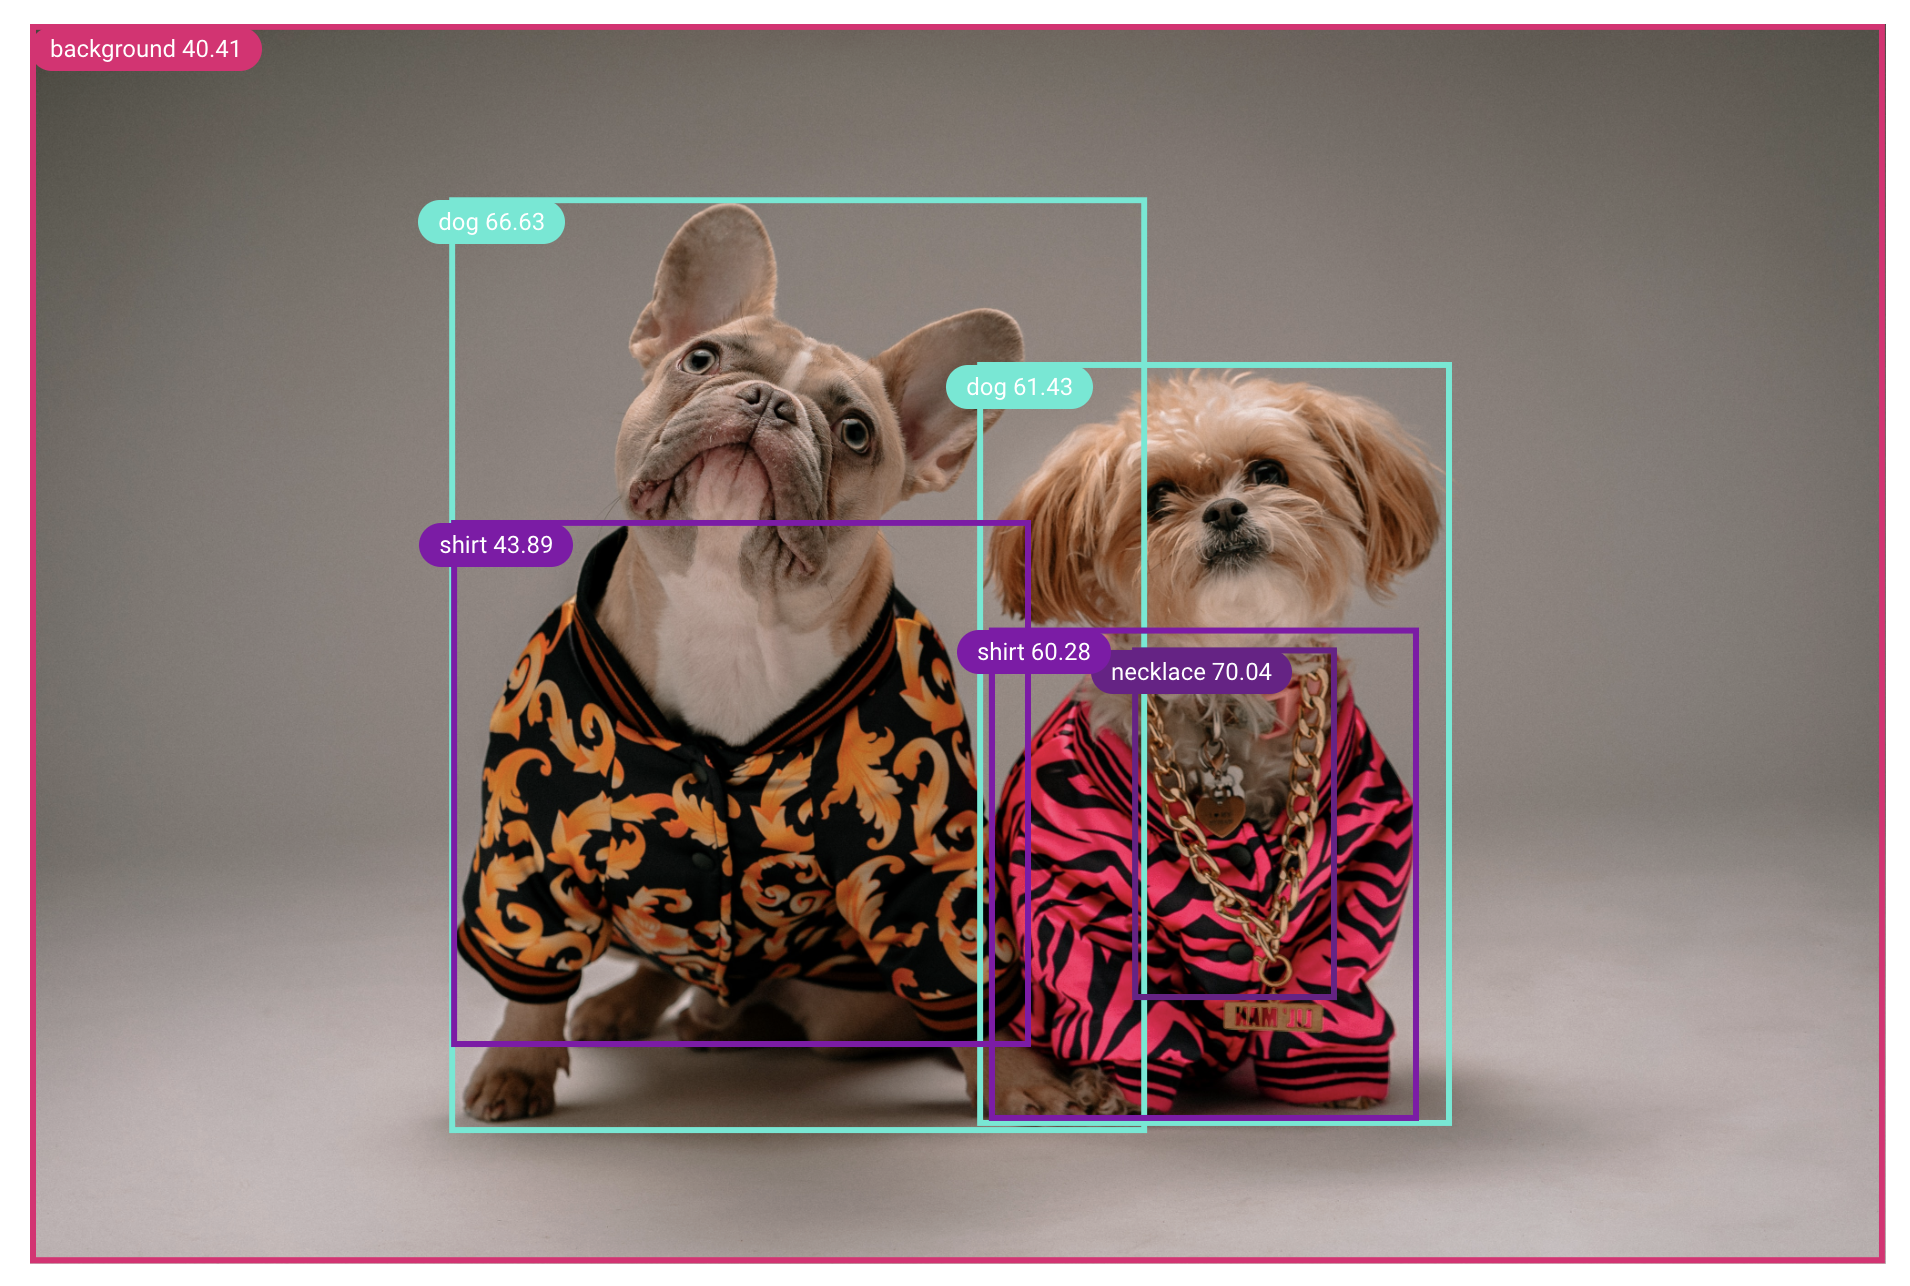
We will now use these bounding box coordinates to indicate which items we would like to segment in SAM.
Masks with SAM
As mentioned, SAM can either detect all masks automatically within an image, or it can accept prompts that guide it to only detect specific masks within an image. Now that we have our bounding box predictions, we’ll use these coordinates as input prompts to SAM and plot the resulting list of binary masks:
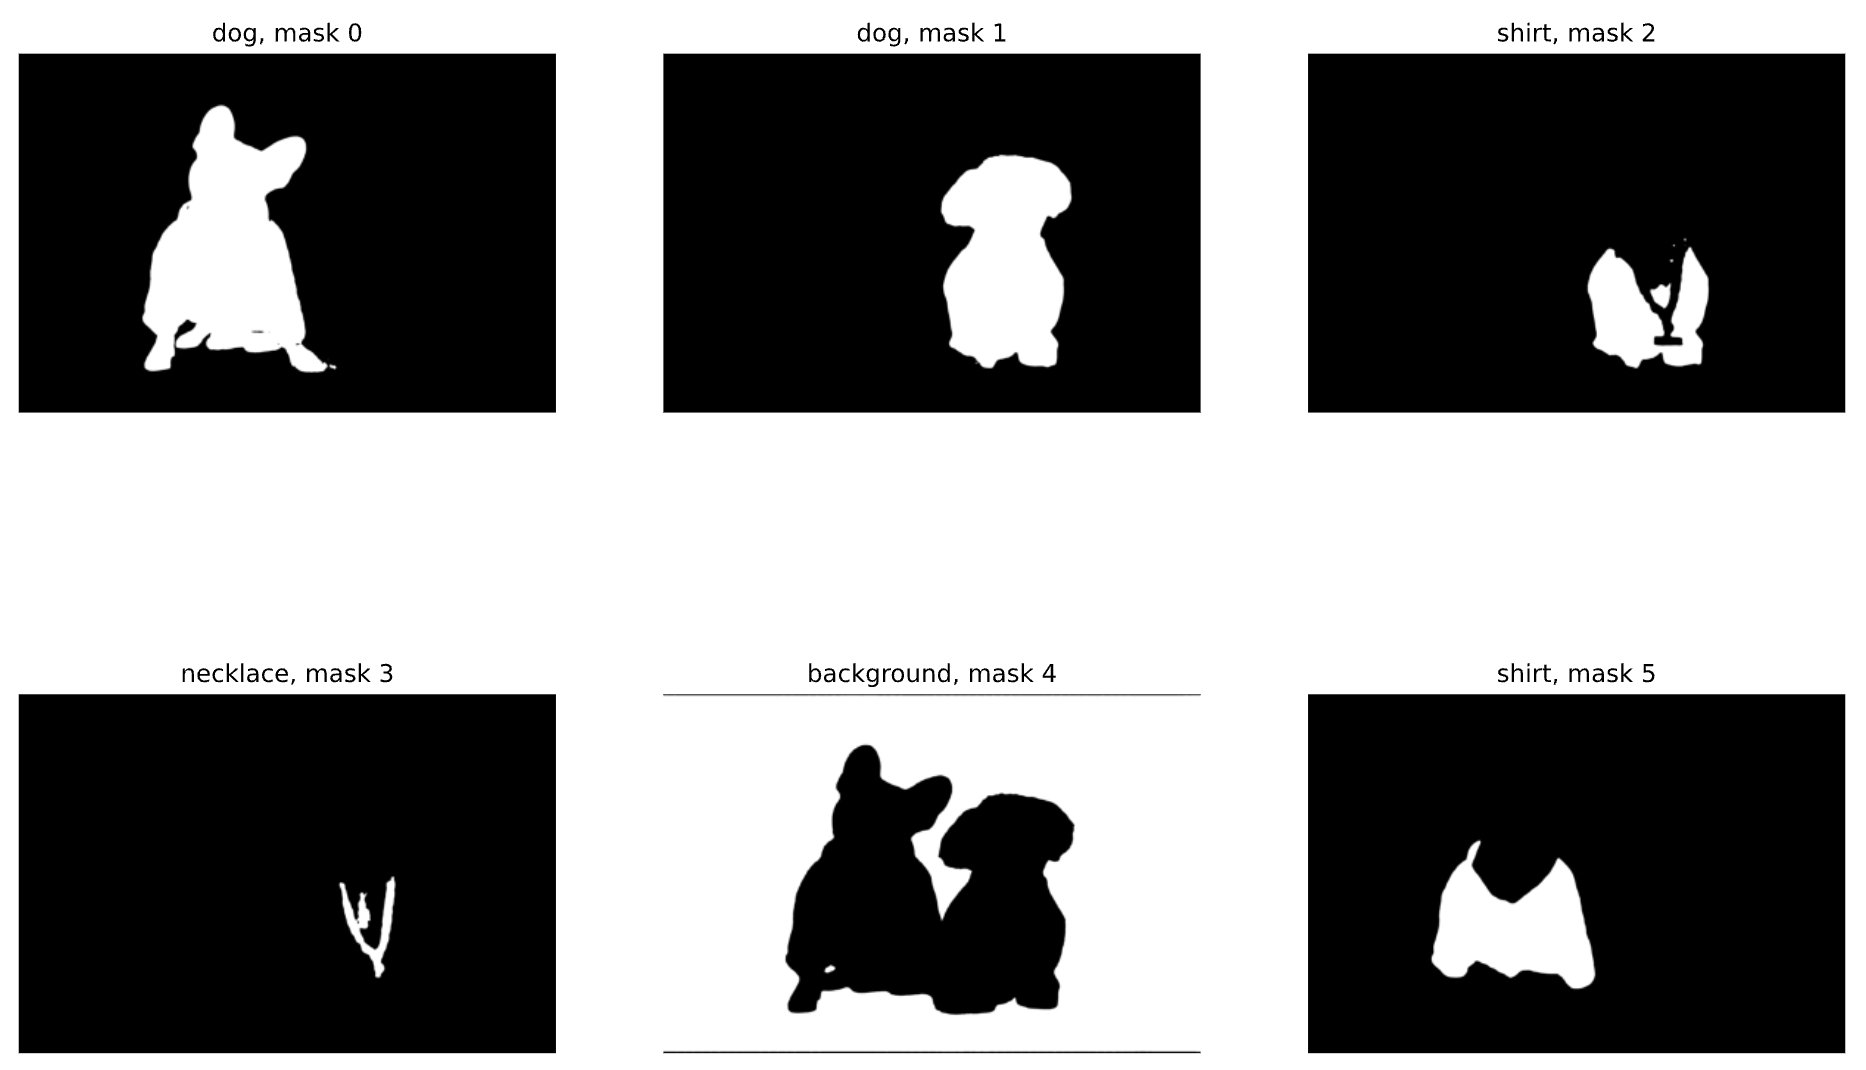
Note that by default, SAM has performed instance segmentation, rather than semantic segmentation, which gives us a lot more flexibility when it comes time for inpainting. Let’s also visualize these masks within the Comet UI:
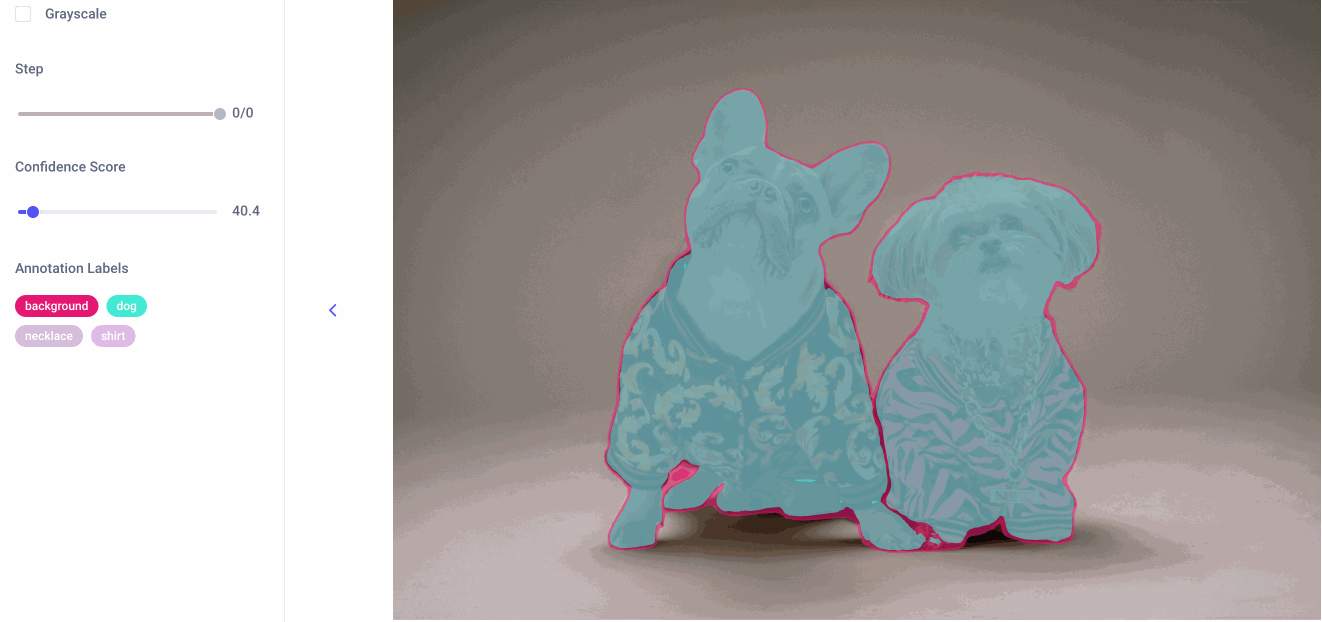
Finally, let’s isolate the masks we want to use for our next task: image inpainting. We’ll be replacing the dog on the right with an old man, so we’ll need the following three masks (we can grab their indices from the binary mask plot above):
Isolating part of a mask with SAM
Now, let’s say we’ve decided we want to replace the dog on the right with an old man, but just the head. If we were detecting masks with points (either interactively or programmatically), we could isolate just the dog’s face from the rest of his body using a positive and negative prompt like so:
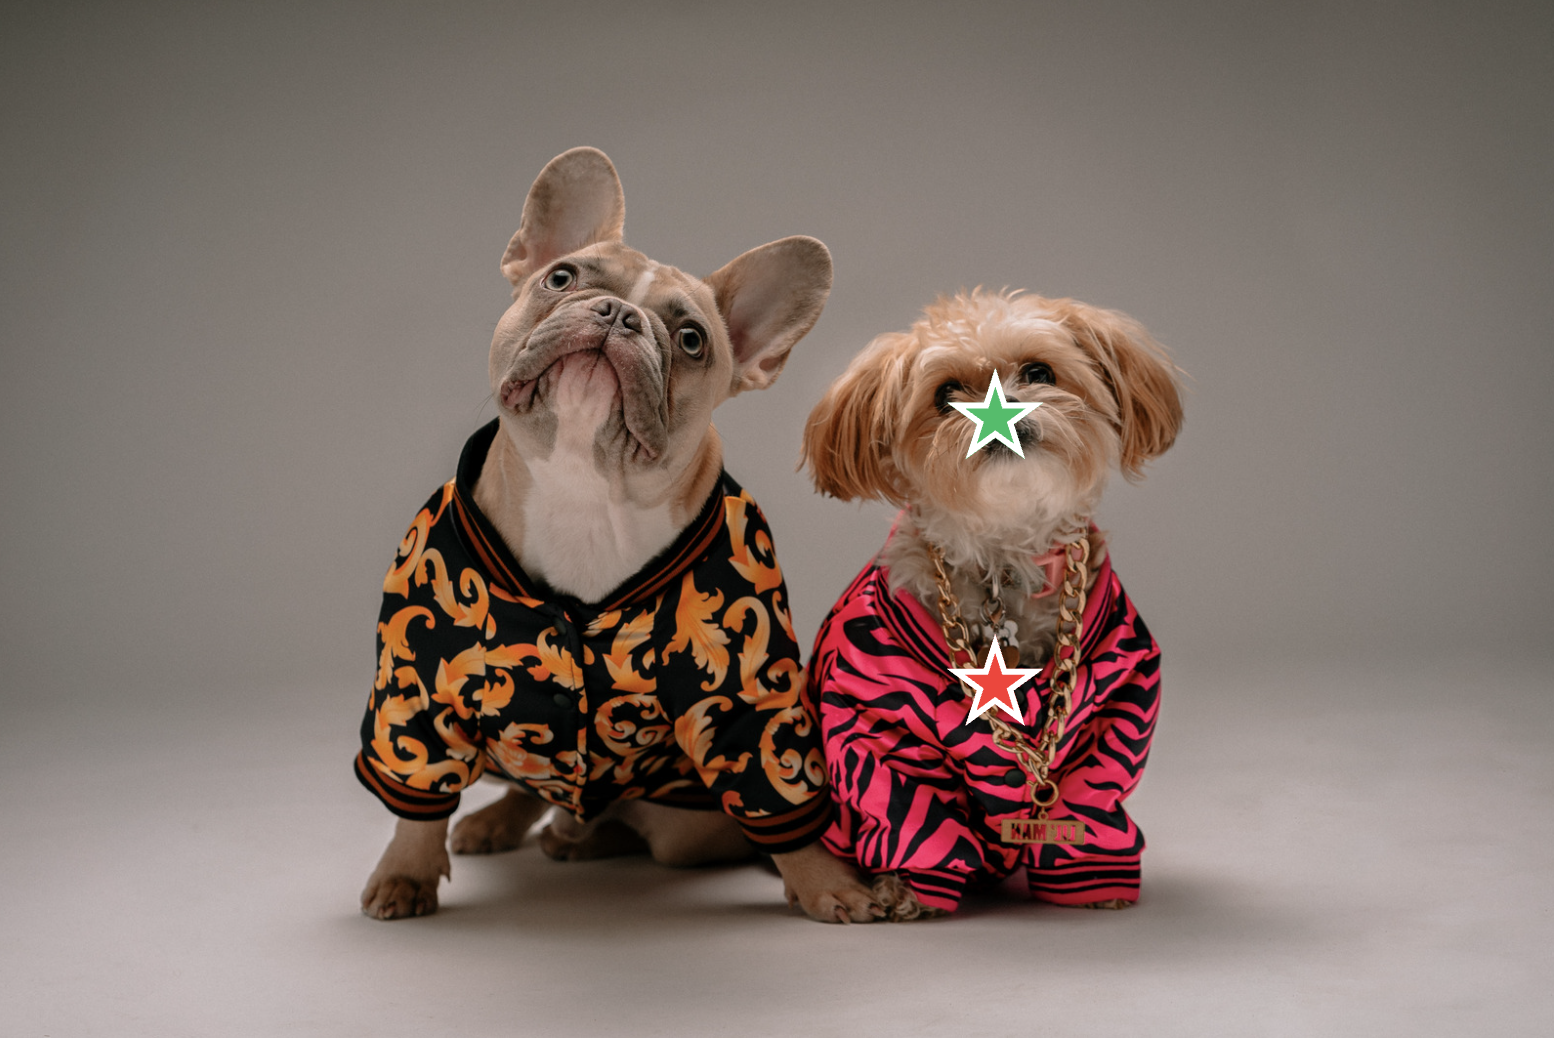
But since we already have our masks arrays, we’ll isolate the dog’s face using np.where. Below, we start with the mask of the dog on the right and subtract the masks for its shirt and necklace. Then we convert the array back to a PIL Image.
Image generation with Stable Diffusion
For our final step we’ll be using Stable Diffusion, a latent text-to-image deep learning model, capable of generating photo-realistic images given any text input. Specifically we’ll be using the Stable Diffusion Inpainting Pipeline, which takes as input a prompt, an image, and a binary mask image. This pipeline will generate an image from the text prompt only for the white pixels (“1”s) of the mask image.
What is inpainting?
Image inpainting refers to the process of filling-in missing data in a designated region of an image. Originally, image inpainting was used to restore damaged regions of a photo to look more like the original, but is now commonly used with masks to intentionally alter regions of an image.
Like SAM, the Stable Diffusion Inpainting Pipeline accepts both a positive and negative input prompt. Here, we instruct it to use the mask corresponding to the right dog’s face and generate “an old man with curly hair” in its place. Our negative prompt instructs the model to disclude specific objects or characteristics in the image it generates. Finally, we set the random seed so we can reproduce our results later on.
Pro tip: Stable Diffusion can be hit or miss. If you don’t like your results the first time, try adjusting the random seed and running the model again. If you still don’t like your results, try adjusting your prompts. For more on prompt engineering, read here.
That was simple! Now let’s try outpainting.
What is outpainting?
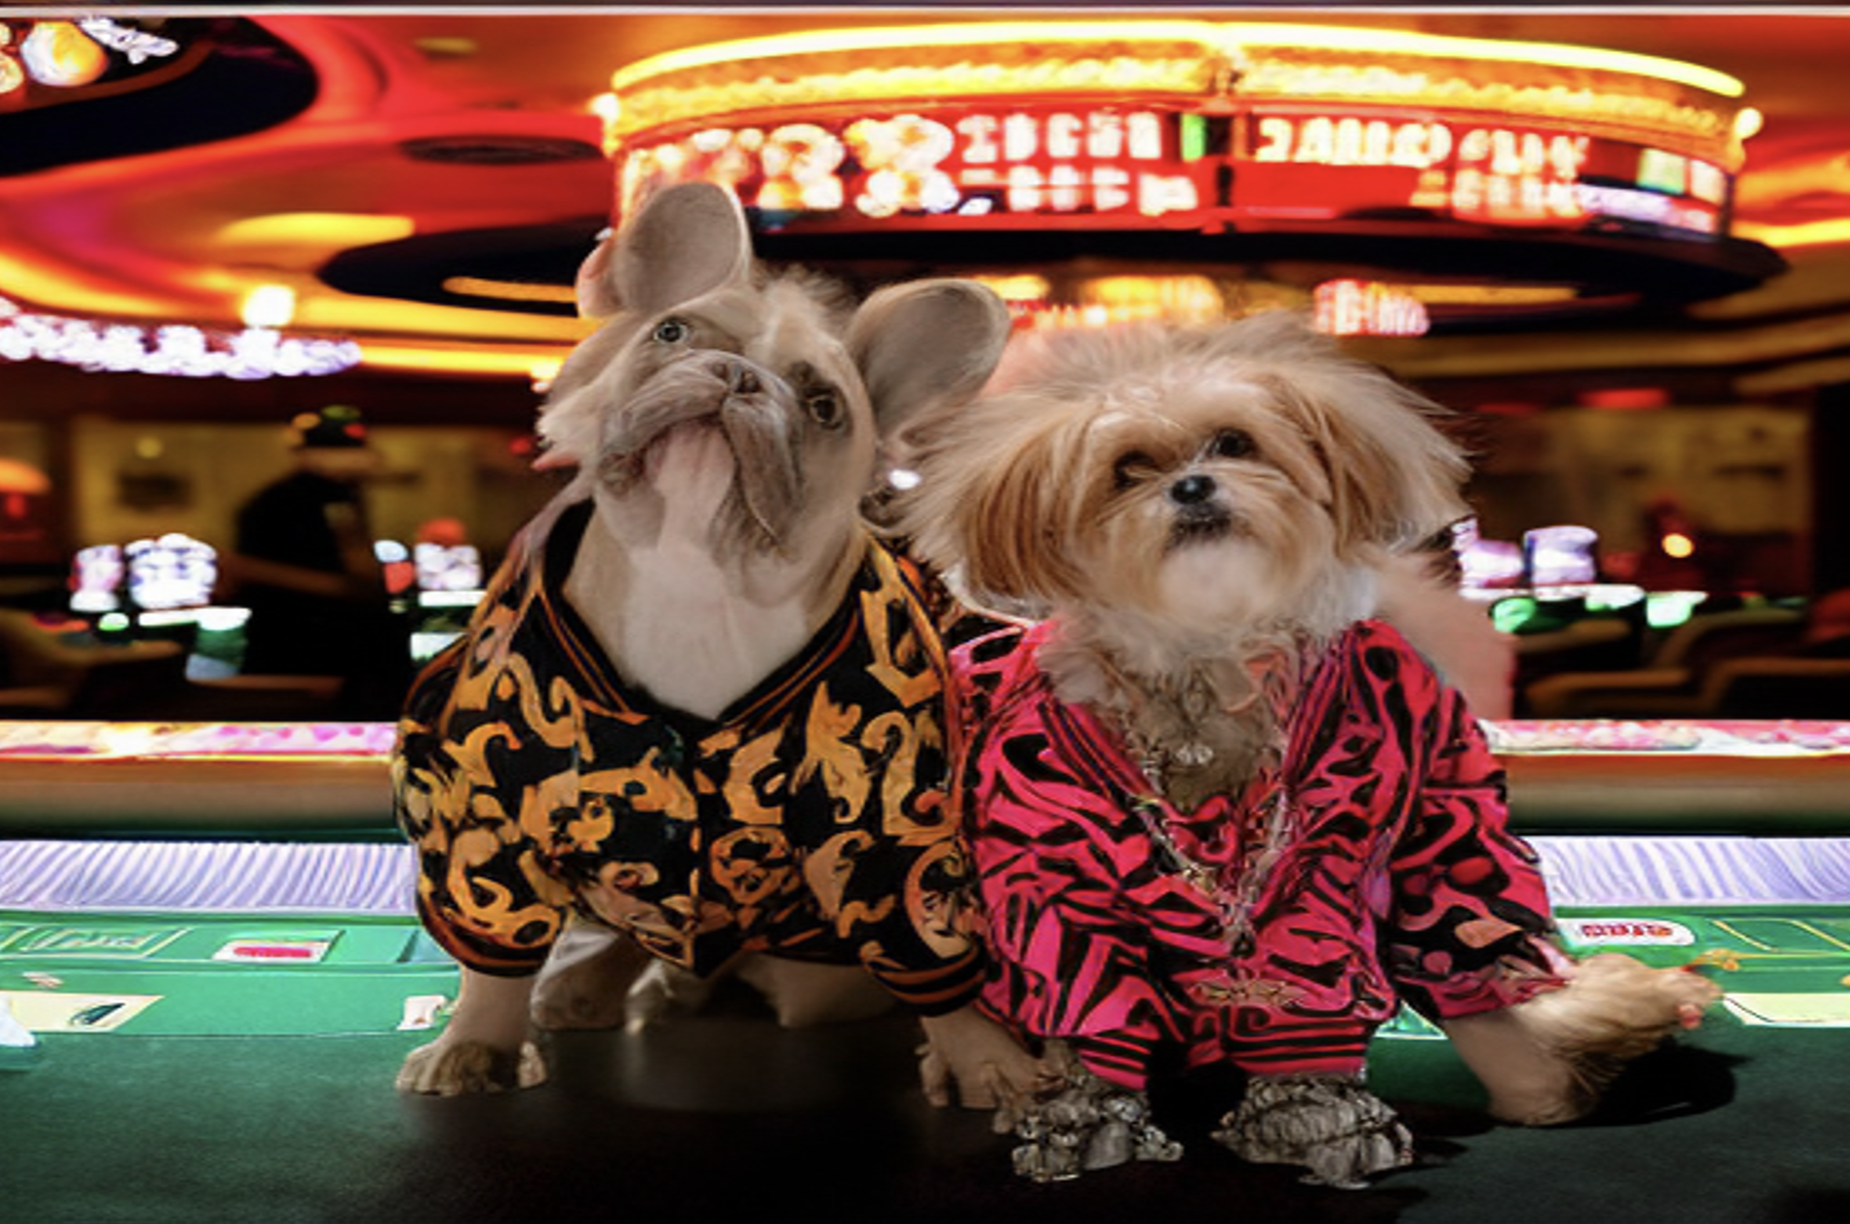
Image outpainting is the process of using generative AI to extend images beyond their original borders, thereby generating parts of the image that didn’t exist before. We’ll effectively do this by masking the original background and using the same Stable Diffusion Inpainting Pipeline.
The only difference here will be the input mask (now the background), and the input prompt. Let’s bring the dogs to Las Vegas!
Inpainting multiple objects with Stable Diffusion
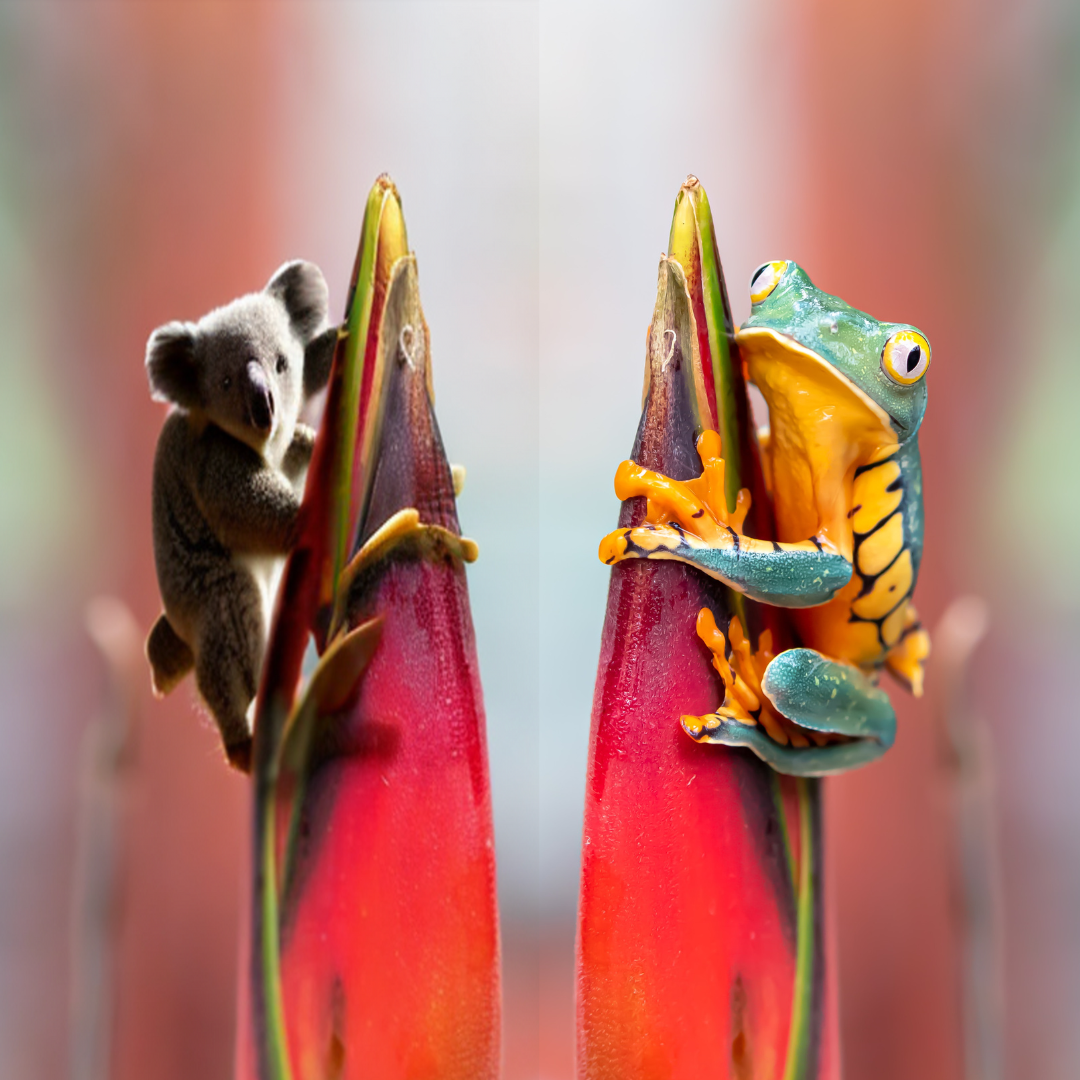
Now let’s try segmenting more than one object in an image. In the next image we’ll ask the model to detect both the frog and the flower. We’ll then instruct the model to replace the frog with a koala bear, and replace the flower with the Empire State Building.
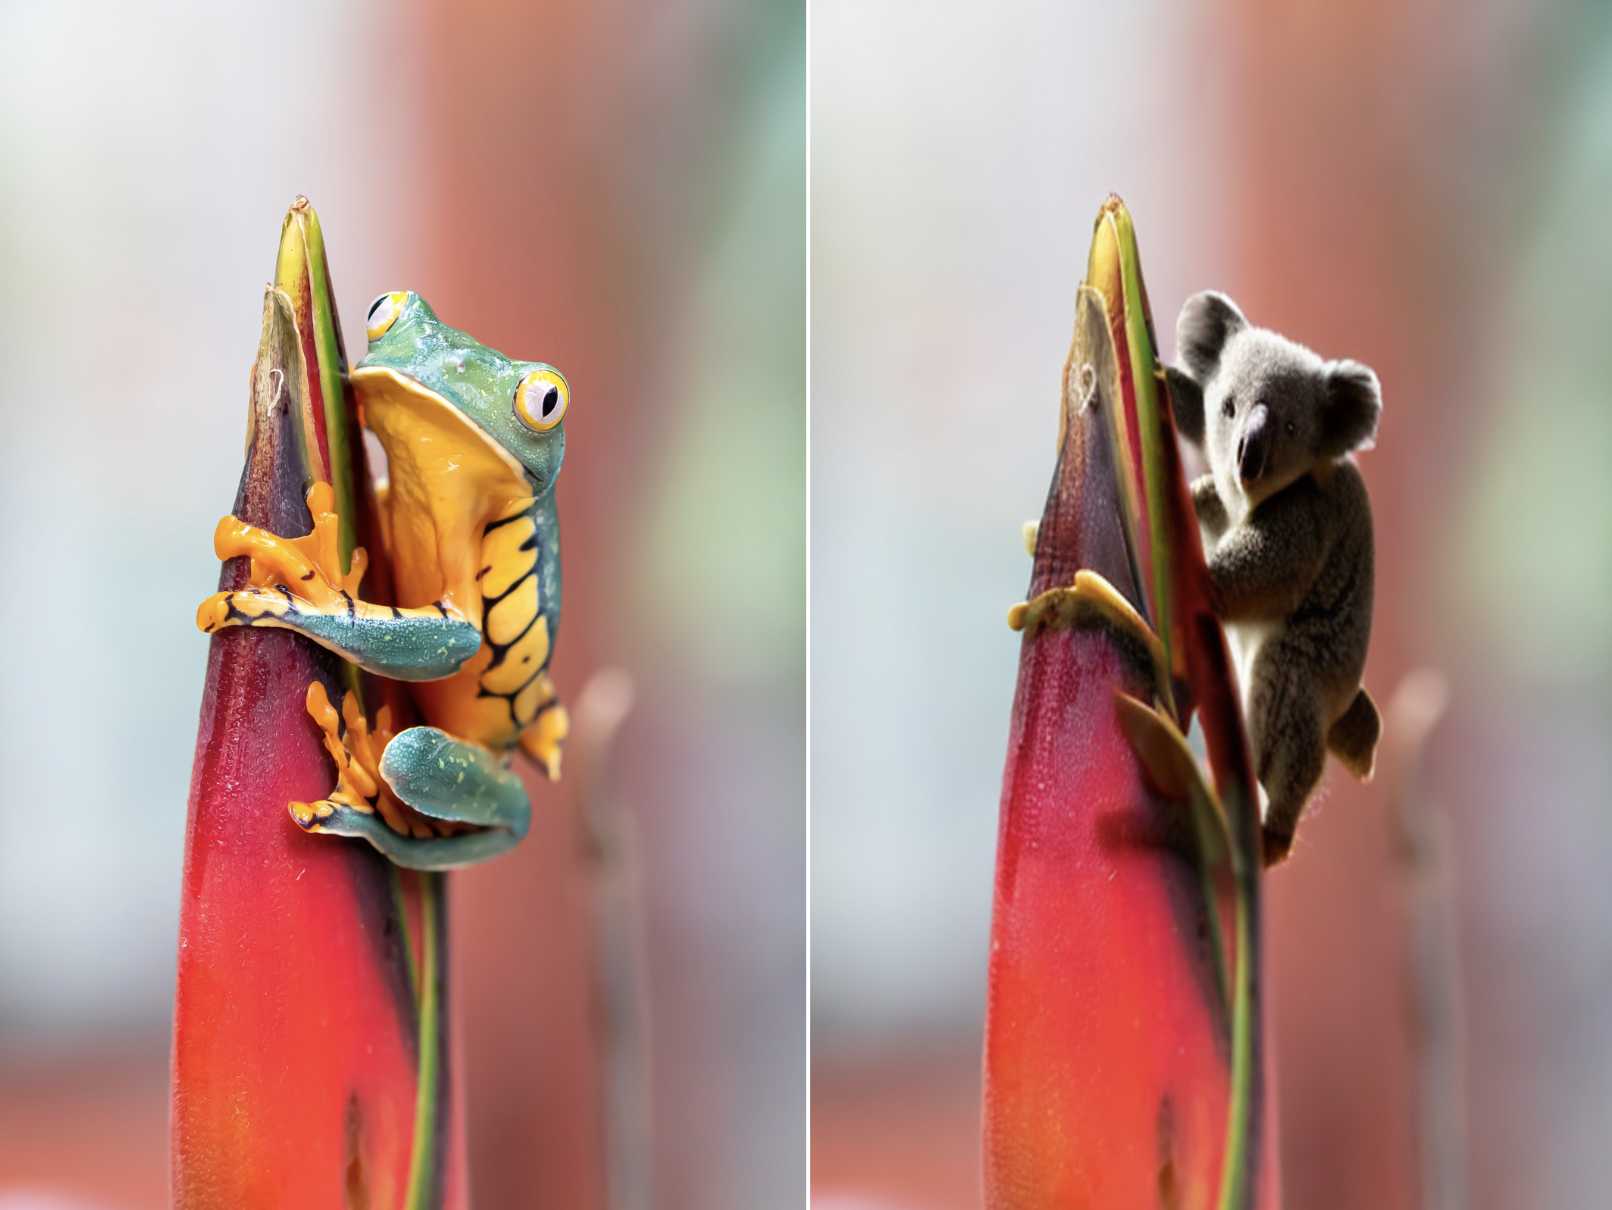
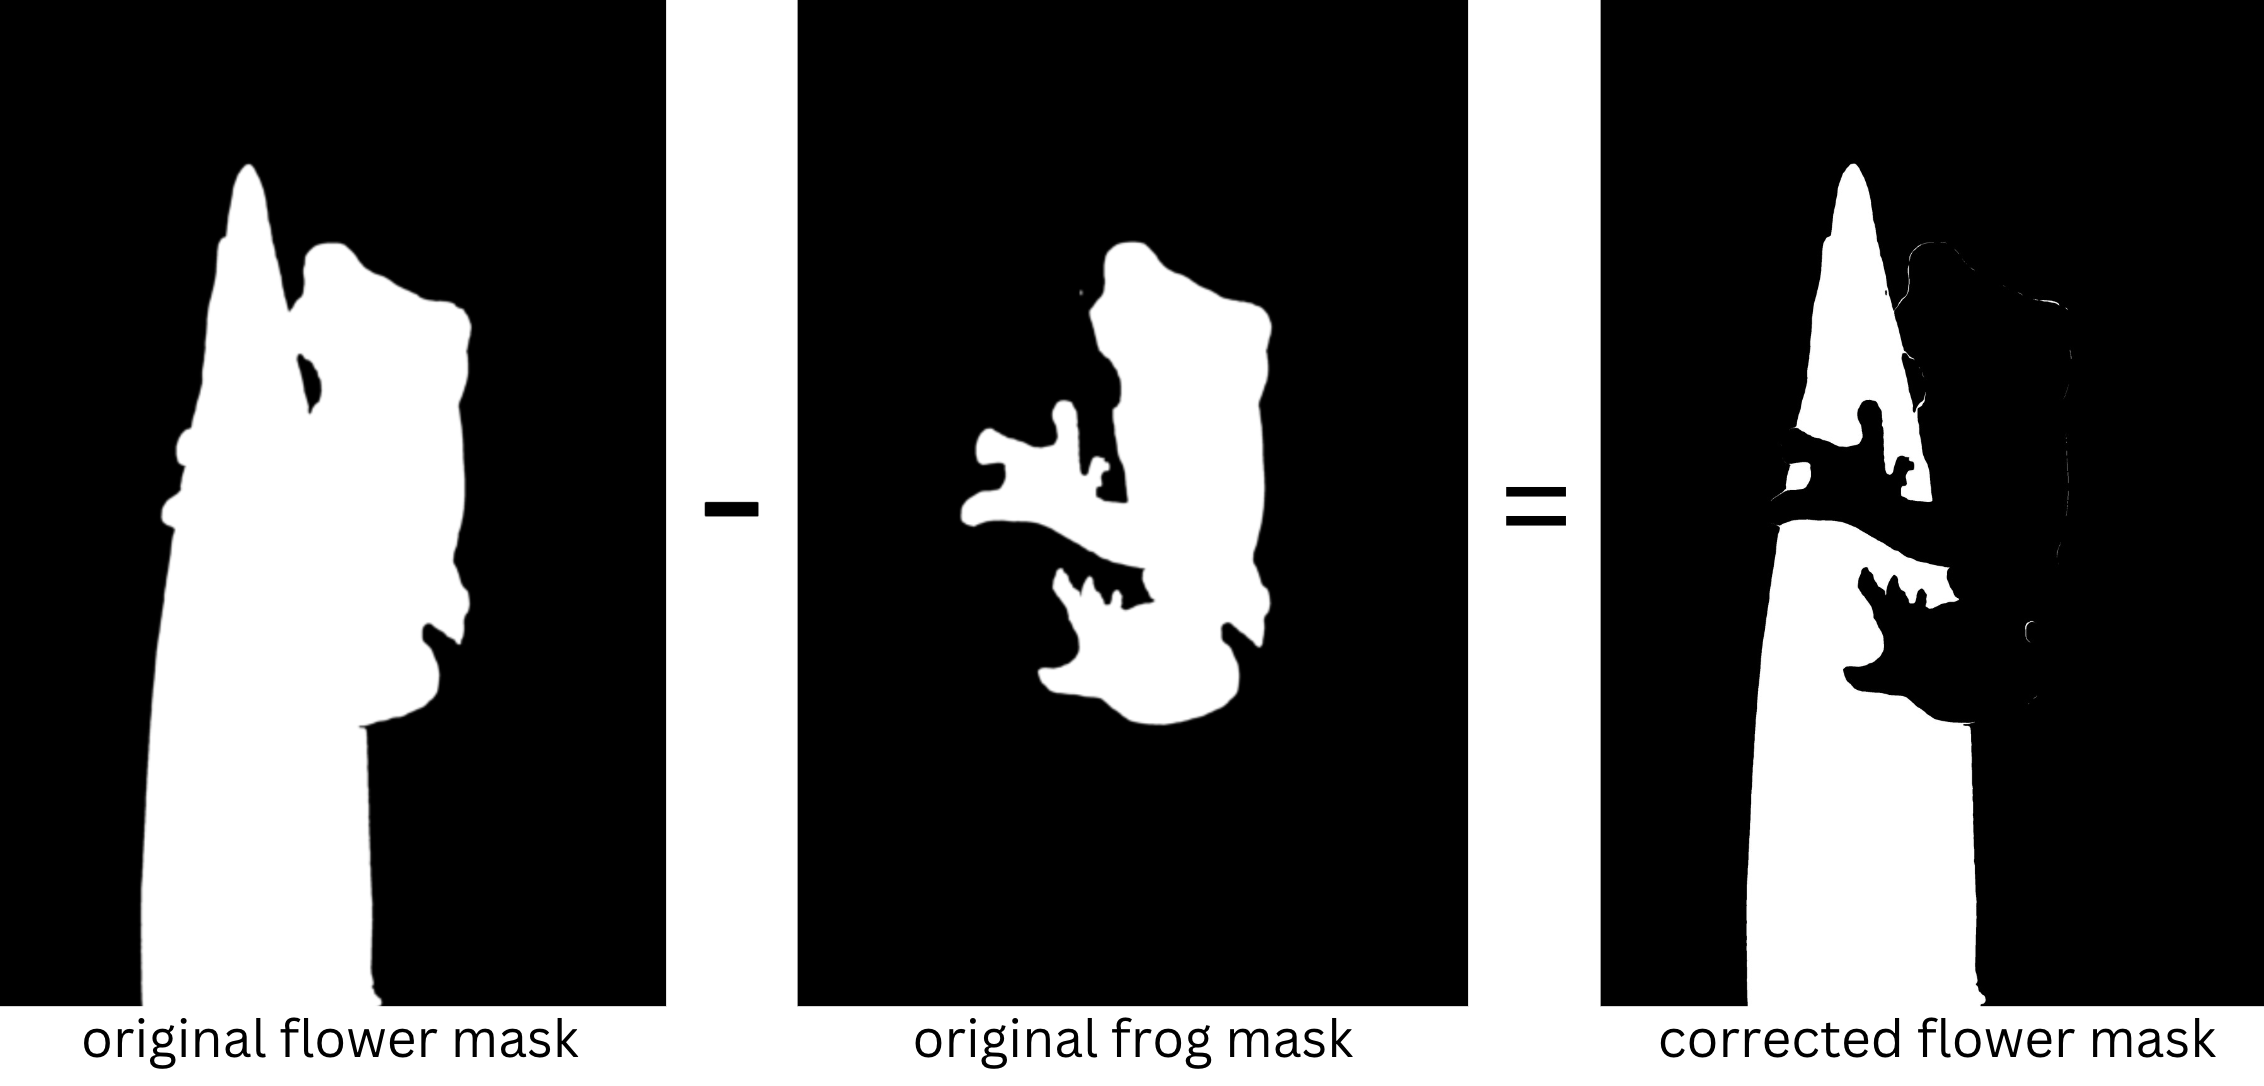
The model thinks the flower includes the frog, but we can work around that by subtracting the frog mask and then converting the new mask to a PIL image.
Once we’ve separated the flower, let’s replace it with the Empire State Building:
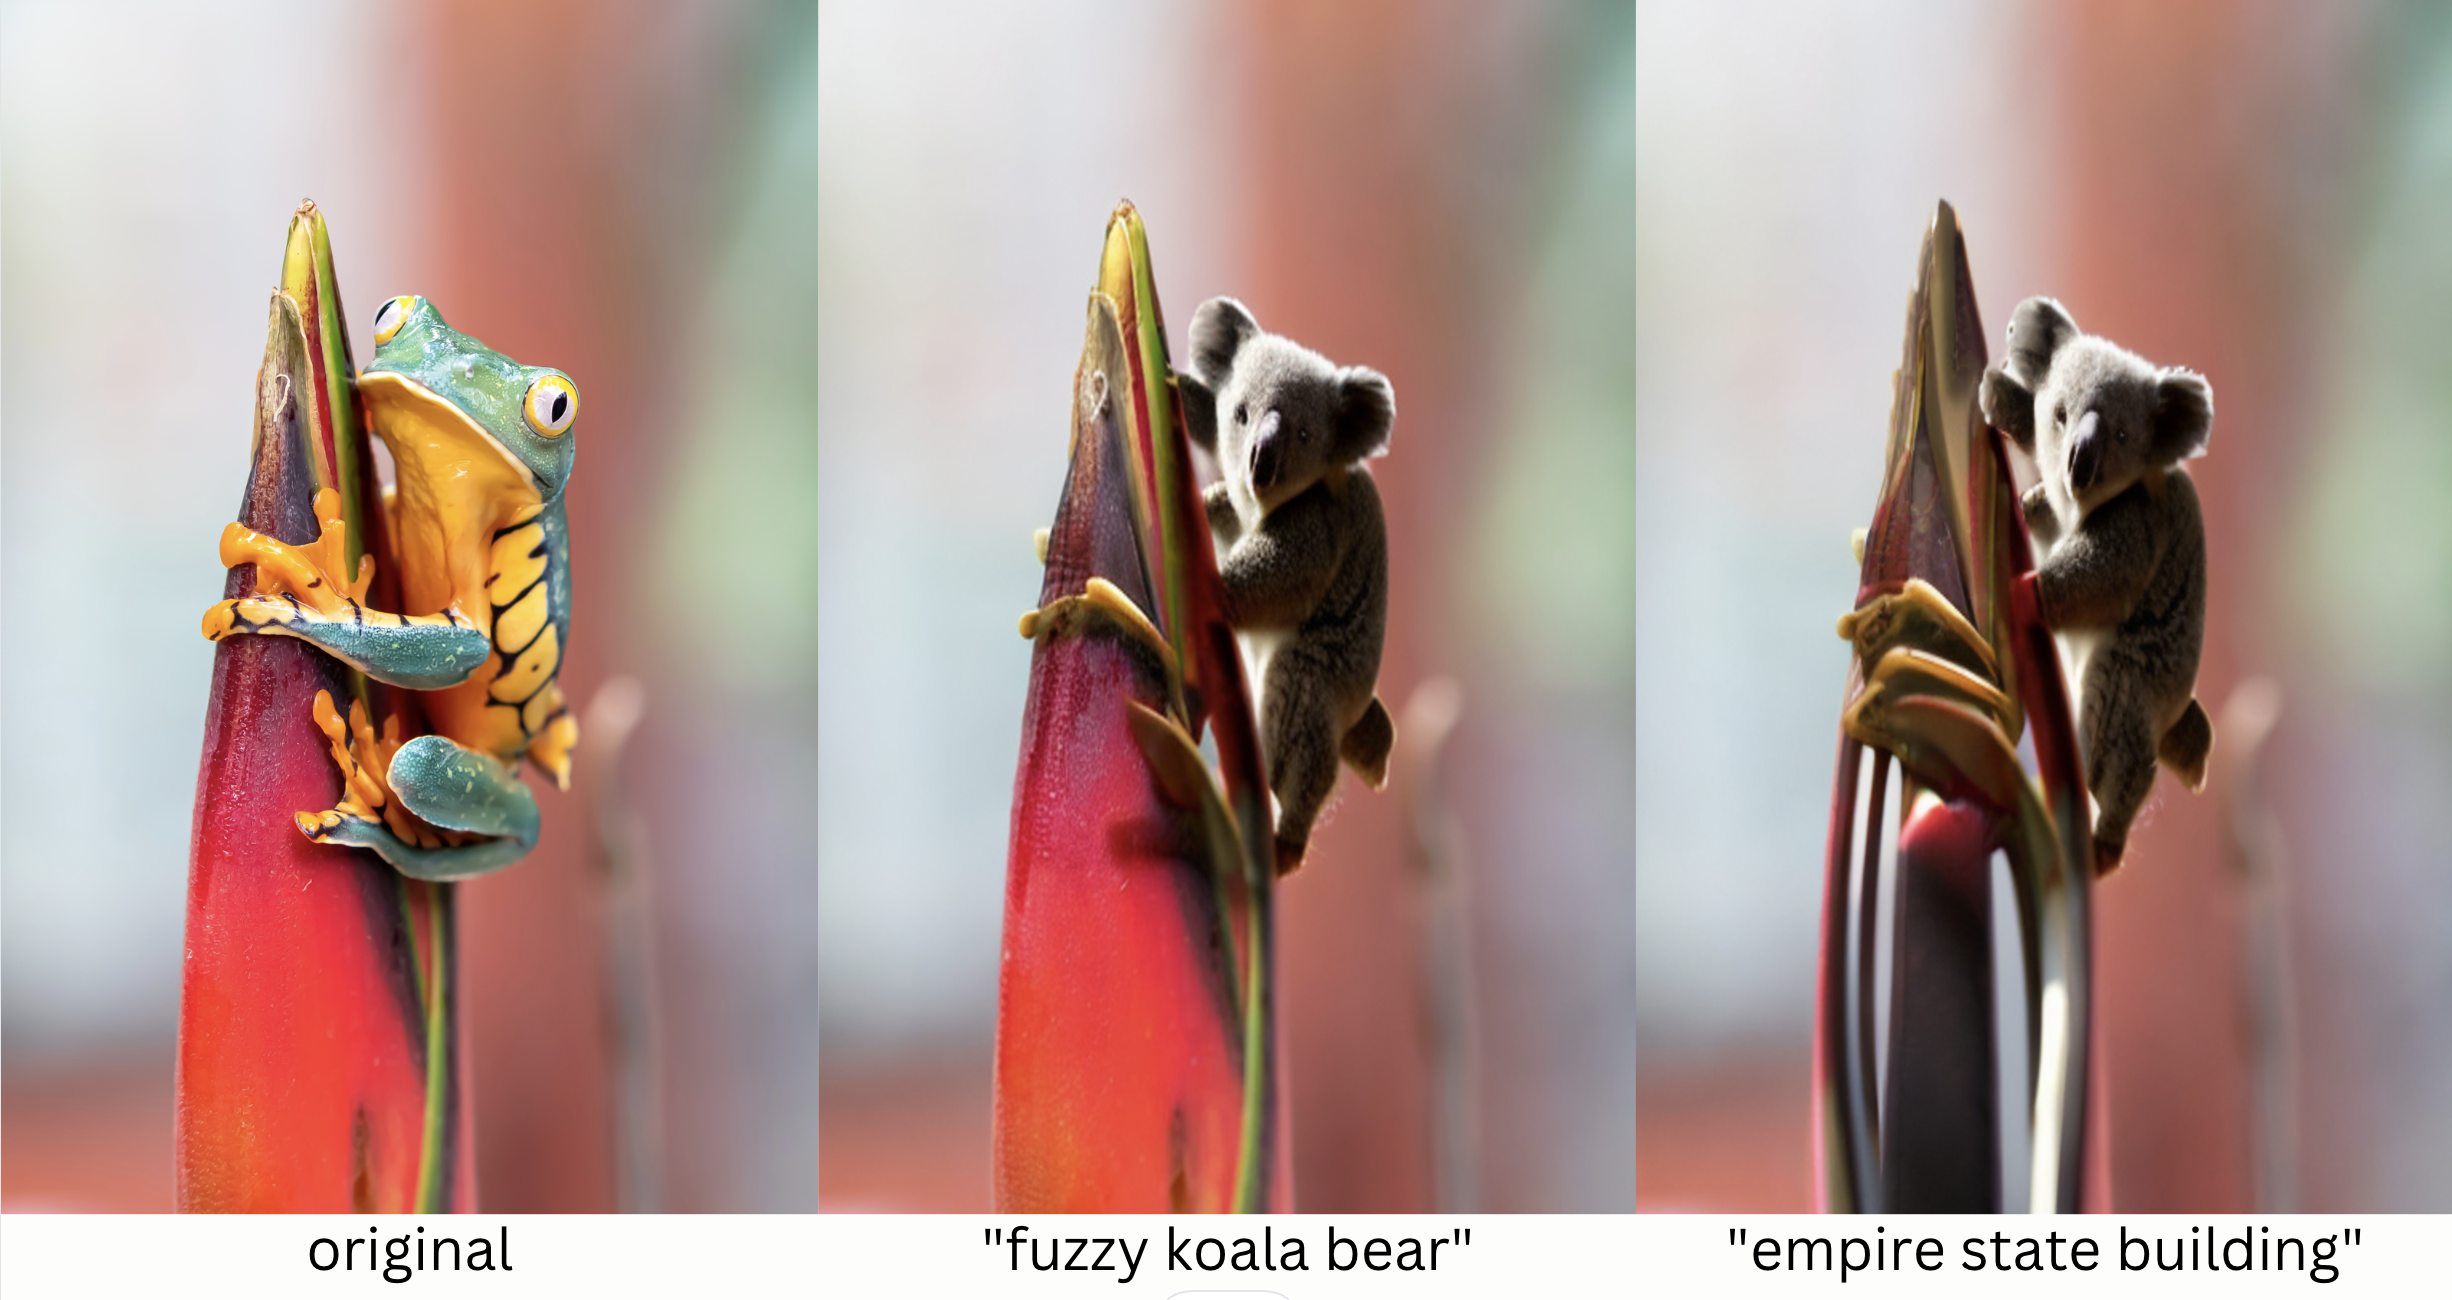
Our model isn’t perfect; it looks like our koala may have a fifth leg, and there’s still some remnants of frog on the skyscraper, but generally, our pipeline performed pretty well!
Defining the background for Stable Diffusion
Sometimes our object detector, GroundingDINO won’t detect the background. But we can still easily perform outpainting!
To create a background mask when one isn’t detected, we can just take the inverse of the object mask. If multiple objects are in the image, we would just add these masks together, and then take the inverse of this sum.
We can then follow the same process as in the previous examples.
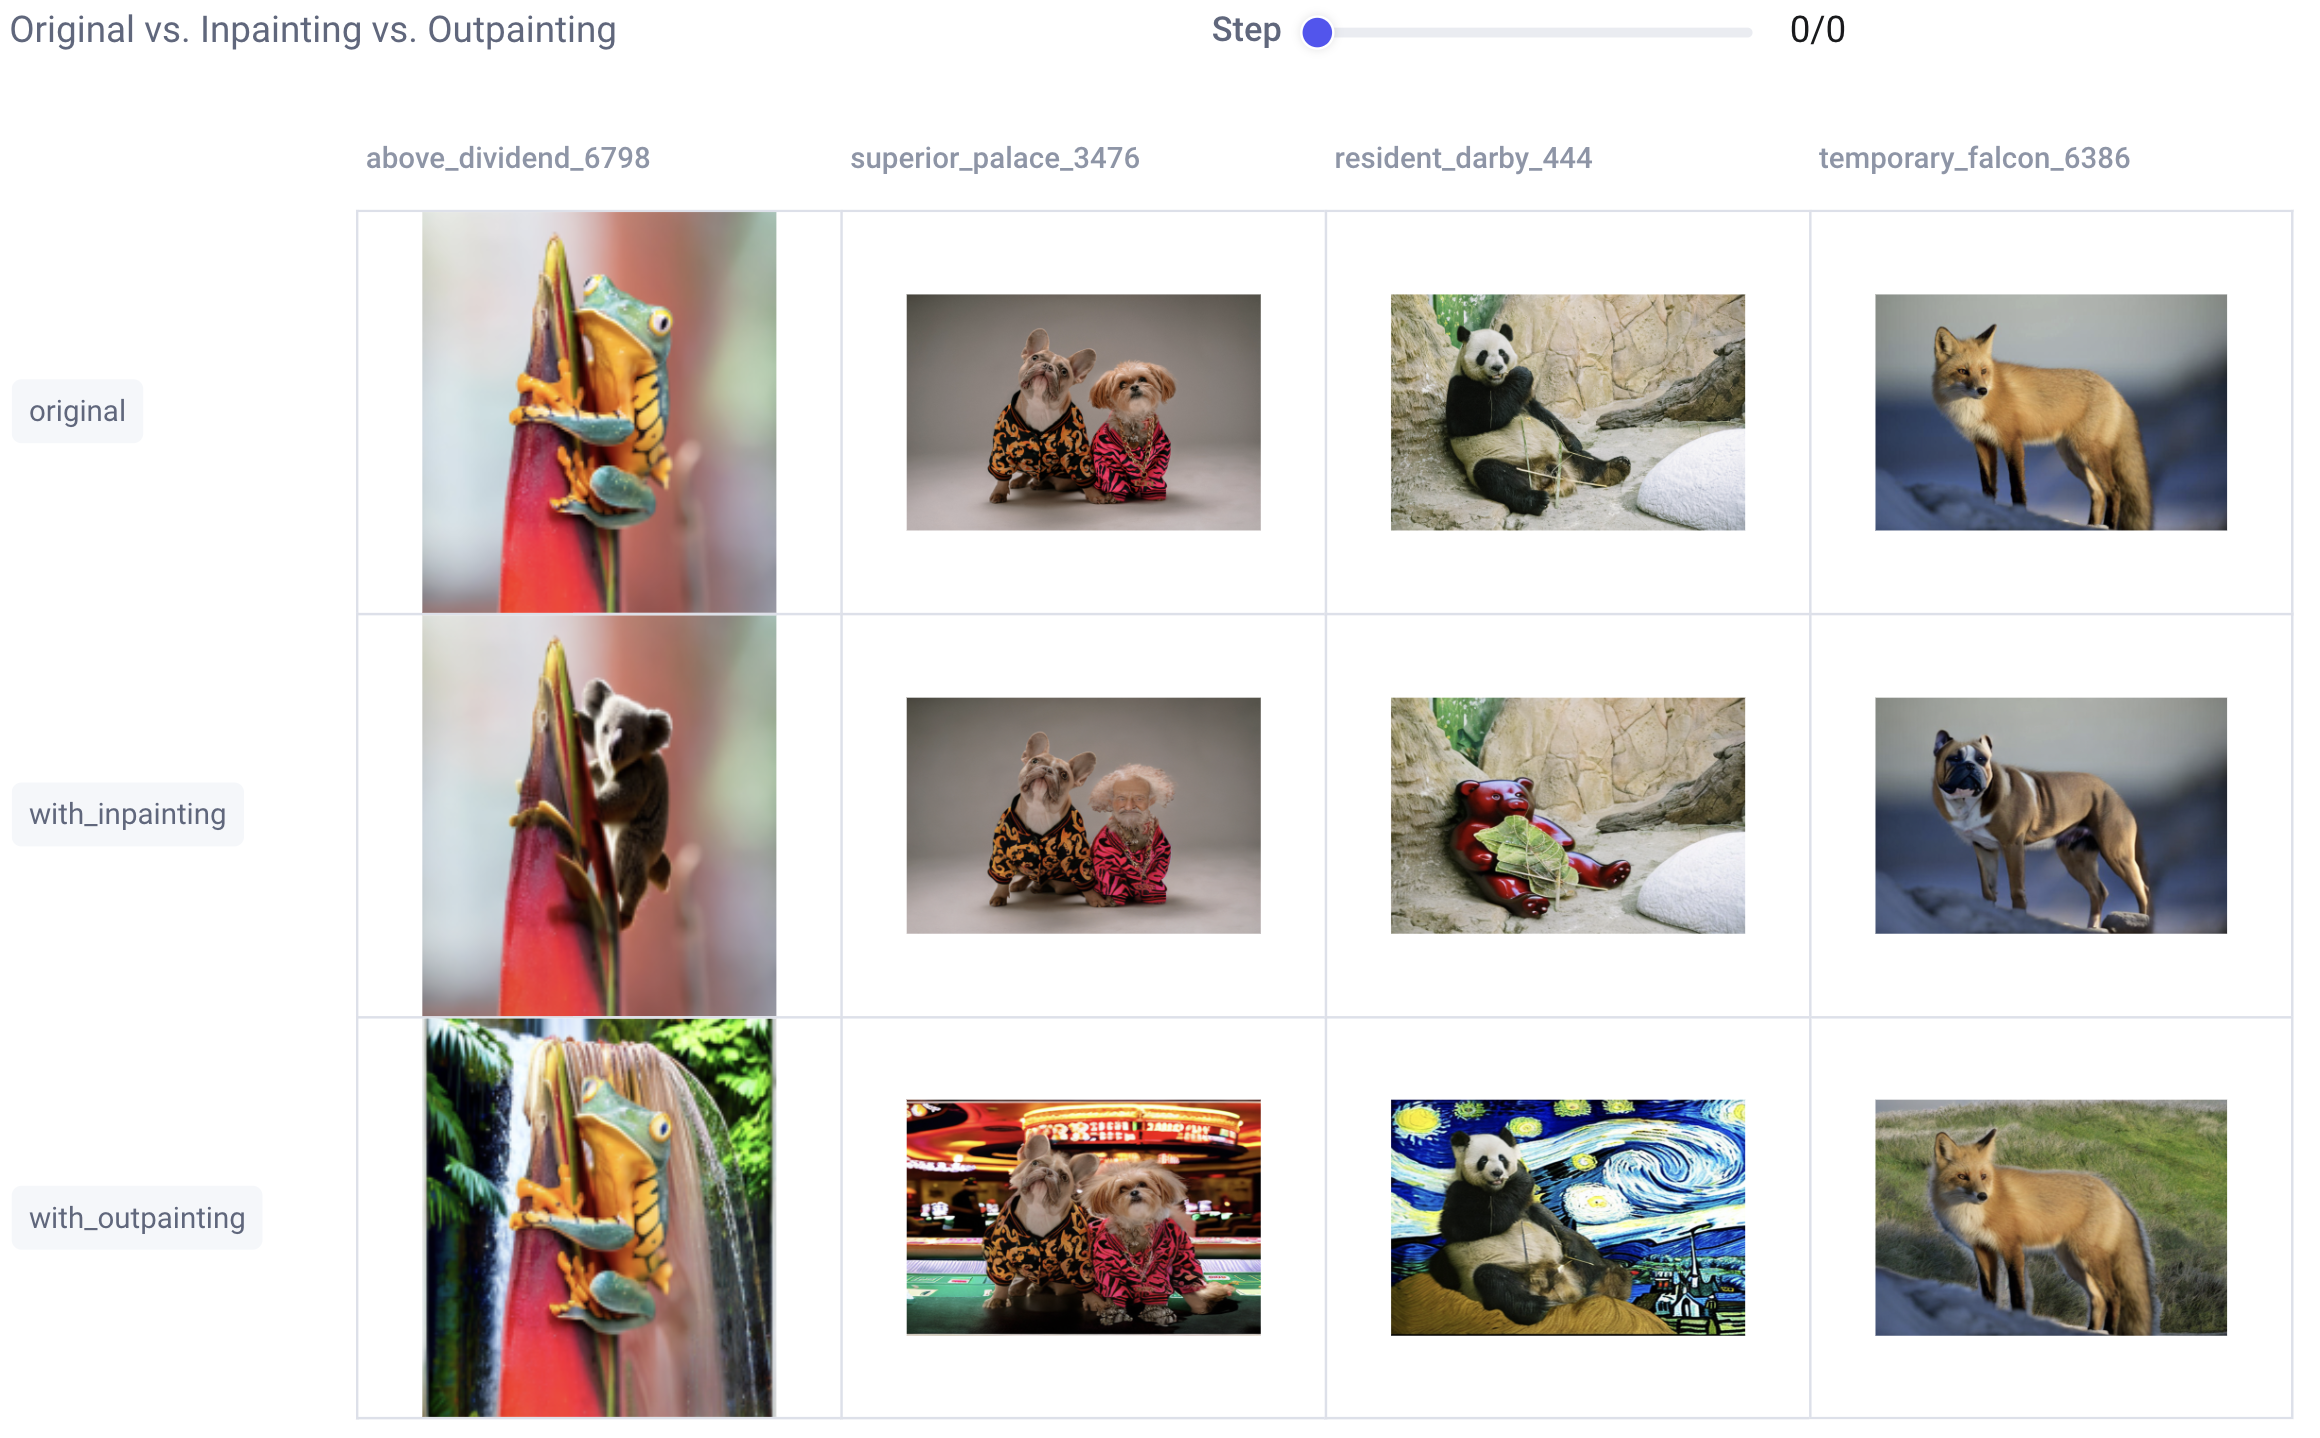
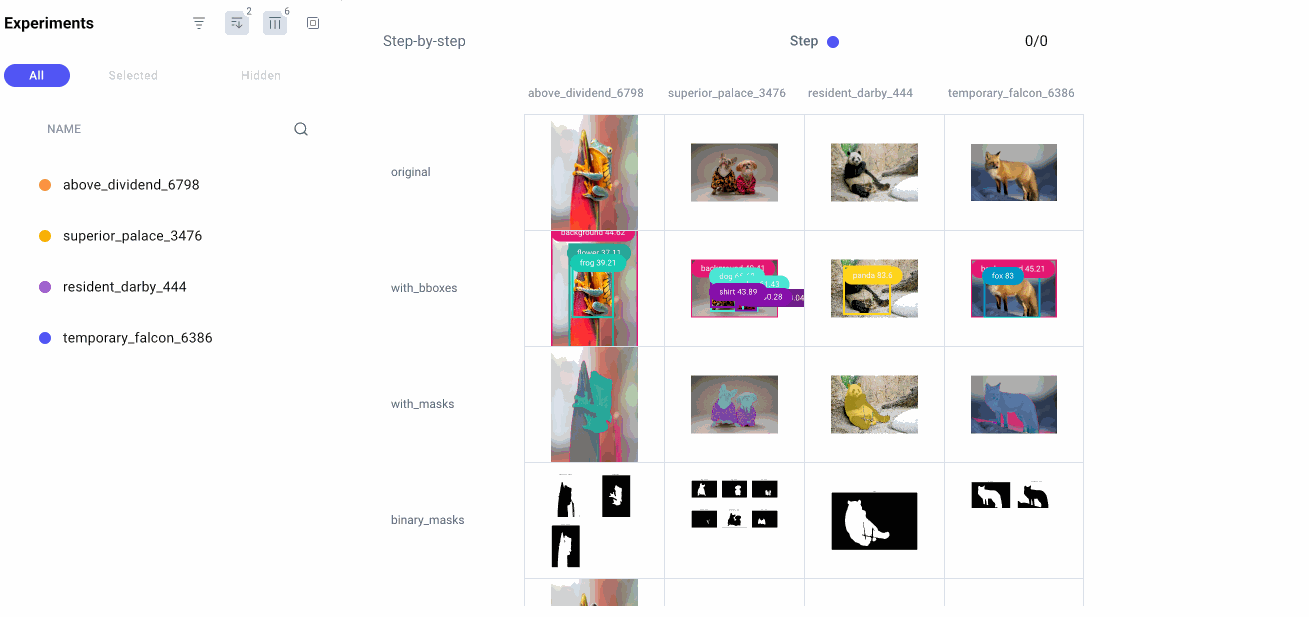
Viewing our SAM + Stable Diffusion results in Comet
As you can probably imagine, keeping track of which input images, prompts, masks, and random seeds were used to create which output images can get confusing, fast! That’s why we logged all of our images to Comet as we went.
Let’s head on over to the Comet UI now and take a look at each of our input images and the resulting output images after inpainting and outpainting:
That’s a nice, clean dashboard, but sometimes we want to get a deeper understanding of how we went from point A to point B. Or, maybe, something has gone wrong and we need to take a deeper look at each step of the process to debug. For this, we’ll check our custom Debugging dashboard:
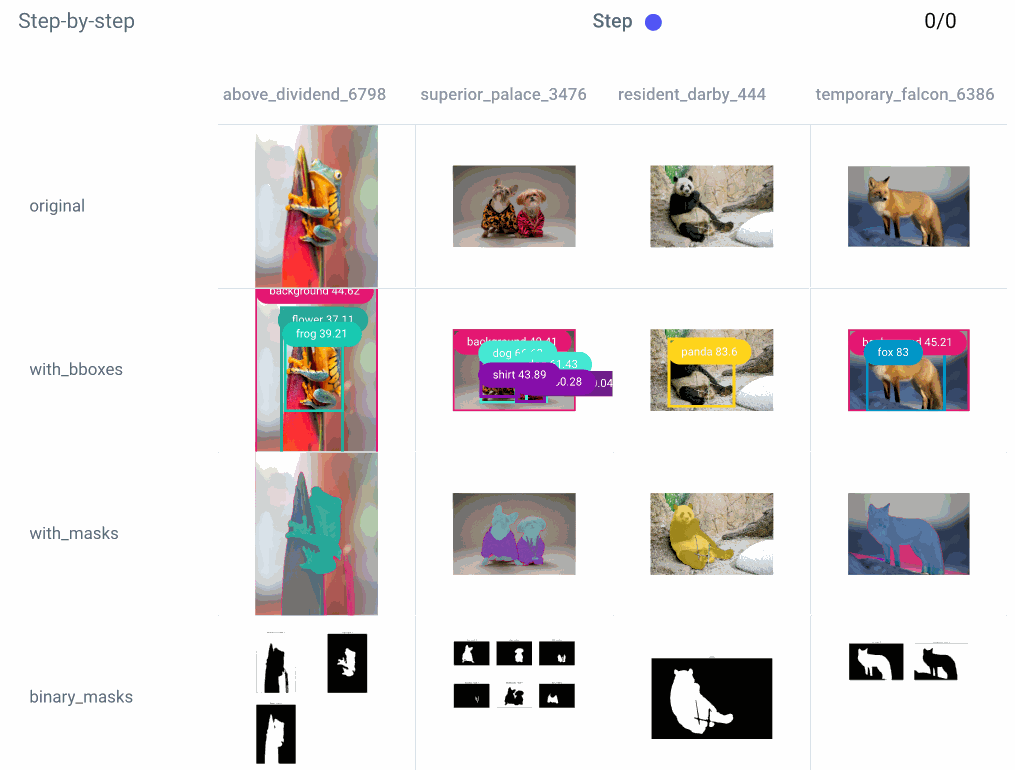
We can also take a closer look at each step of an individual experiment:
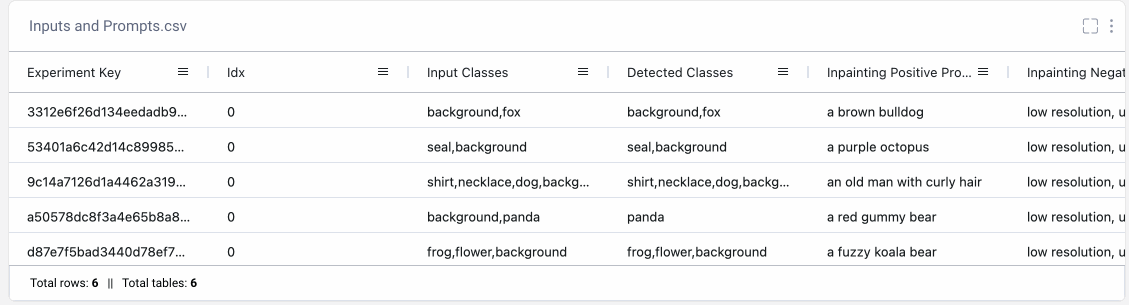
Tracking our prompts with Comet
We’ll also want to make sure to keep track of how we created each output so we can reproduce any of the results later on. Maybe we’ve run different versions of the same prompt multiple times. Or maybe we’ve tried different random seeds and want to pick our favorite result. By logging our prompts to Comet’s Data Panel, we can easily retrieve all the relevant information to recreate any of our image outputs.
Now that you’re an inpainting pro, try out the pipeline on your own images!

Conclusion
Thanks for making it all the way to the end, and I hope you found this SAM + Stable Diffusion tutorial helpful! For questions, comments, or feedback, feel free to drop a note in the comments below. Happy coding!
Frequently Asked Questions (FAQs)
Where can I find the full code for this tutorial?
Find the full code tutorial in this Colab here.
Where can I find the images used in this tutorial?
Download the dataset on Kaggle here.
Is Segment Anything open source?
Yes, the Segment Anything model and dataset are both open source! Find the code for the Segment Anything Model here and download the full Segment Anything dataset here.
How many images were used to train SAM?
The Segment Anything dataset consists of 100 million images with 1.1 billion segmentation masks. It’s roughly 400x larger than the next largest segmentation mask dataset and 6x larger than OpenImages V5.
Is the Segment Anything Model a foundational model?
Yes, the Segment Anything model is considered the first foundational model for computer vision.
Is there a Segment Anything paper?
Yes, there is a Segment Anything paper available for free on arxiv.org here.
Is there a Segment Anything demo?
There is a free interactive Segment Anything demo available online here
Is there a Segment Anything API?
There is not currently a Segment Anything API, but the code is open source and available on GitHub.
Is there a Stable Diffusion repo?
Yes, there is a Stable Diffusion GitHub repository.
Is there a Stable Diffusion API?
Yes, there is a Stable Diffusion and Dreambooth API. Learn more here.
Where can I create a Comet account?
Sign up for a free Comet account here.
Image Credits
The sample images used in this tutorial were all downloaded originally from Unsplash:
- Dog image by Karsten Winegeart.
- Fox image by Ray Hennessy.
- Frog image by Stephanie LeBlanc.
- Panda image by Jason Sung.
Related Articles