The Importance of Data Pipelines in the Era of Generative AI
We have data everywhere. Linkedin, Medium, Github, Substack, and many other platforms. To be able to build your Digital Twin, you need data. Not all types of data, but organized, clean, and normalized data. In Lesson 2, we will learn how to think and build a data pipeline by aggregating data from:
- Medium
- Github
- Substack
We will present all our architectural decisions regarding the design of the data collection pipeline for social media data and why separating raw data and feature data is essential.
Note: This Blog Post is the Second Part of a series for the LLM Twin Course. Click here to read the first part!
In Lesson 3, we will present the CDC (change data capture) pattern, a database architecture, and a design for data management systems.
CDC’s primary purpose is to identify and capture changes made to database data, such as insertions, updates, and deletions.
It then logs these events and sends them to a message queue, like RabbitMQ. This allows other system parts to react to the data changes in real-time by reading from the queue, ensuring that all application parts are up-to-date.
We will go into detail in Lesson 3.
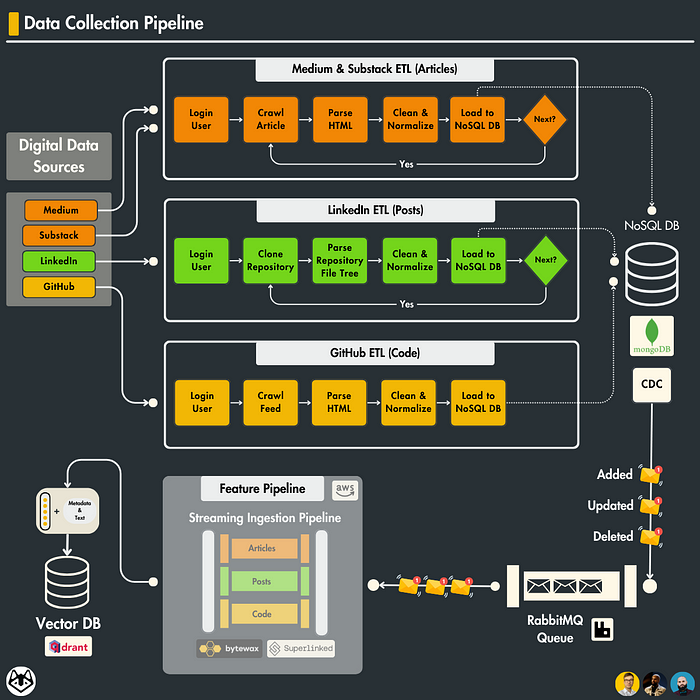
Table of Contents
- What is a data pipeline? The critical point in any AI project.
- Data crawling. How to collect your data?
- How do you store your data?
- Raw data vs. Features data
- Cloud Infrastructure
- Wrap-up — Run everything
🔗 Check out the code on GitHub [1] and support us with a ⭐️
1. What is a data pipeline? The critical point in any AI project.
Data is the lifeblood of any successful AI project, and a well-engineered data pipeline is the key to harnessing its power.
This automated system acts as the engine, seamlessly moving data through various stages and transforming it from raw form into actionable insights.
But what exactly is a data pipeline, and why is it so critical?
A data pipeline is a series of automated steps that guide data on a purpose.
It starts with data collection, gathering information from diverse sources, such as LinkedIn, Medium, Substack, Github, etc.
The pipeline then tackles the raw data, performing cleaning and transformation.
This step removes inconsistencies and irrelevant information and transforms the data into a format suitable for analysis and ML models.
But why are data pipelines so crucial in AI projects? Here are some key reasons:
- Efficiency and Automation: Manual data handling is slow and prone to errors. Pipelines automate the process, ensuring speed and accuracy, especially when dealing with massive data volumes.
- Scalability: AI projects often grow in size and complexity. A well-designed pipeline can scale seamlessly, accommodating this growth without compromising performance.
- Quality and Consistency: Pipelines standardize data handling, ensuring consistent and high-quality data throughout the project lifecycle, leading to more reliable AI models.
- Flexibility and Adaptability: The AI landscape is constantly evolving. A robust data pipeline can adapt to changing requirements without a complete rebuild, ensuring long-term value.
Data is the engine of any ML model. If we don’t give it enough importance, the model’s output will be very unexpected.
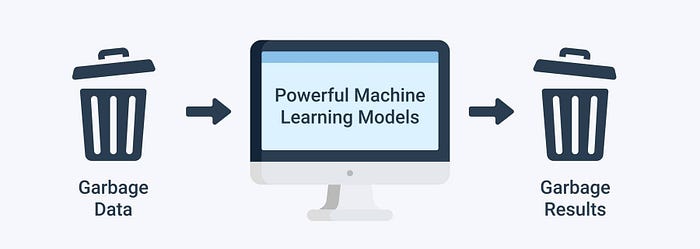
But how can we transform the raw data into actionable insights?
2. Data crawling. How to collect your data?
The first step in building a database of relevant data is choosing our data sources. In this lesson, we will focus on four sources:
- Medium
- Github
- Substack
Why do we choose 4 data sources? We need complexity and diversity in our data to build a powerful LLM twin. To obtain these characteristics, we will focus on building three collections of data:
- Articles
- Social Media Posts
- Code
For the data crawling module, we will focus on two libraries:
- BeautifulSoup: A Python library for parsing HTML and XML documents. It creates parse trees that help us extract the data quickly, but BeautifulSoup needs to fetch the web page for us. That’s why we need to use it alongside libraries like
requestsorSeleniumwhich can fetch the page for us. - Selenium: A tool for automating web browsers. It’s used here to interact with web pages programmatically (like logging into LinkedIn, navigating through profiles, etc.). Selenium can work with various browsers, but this code configures it to work with Chrome. We created a base crawler class to respect the best software engineering practices.
The BaseAbstractCrawler class in a web crawling context is essential for several key reasons:
- Code Reusability and Efficiency: It contains standard methods and properties used by different scrapers, reducing code duplication and promoting efficient development.
- Simplification and Structure: This base class abstracts complex or repetitive code, allowing derived scraper classes to focus on specific tasks. It enforces a consistent structure across different scrapers.
- Ease of Extension: New types of scrapers can easily extend this base class, making the system adaptable and scalable for future requirements.
- Maintenance and Testing: Updates or fixes to standard functionalities must be made only once in the base class, simplifying maintenance and testing.
The class can be found here base.py
import time

from selenium import webdriver
from selenium.webdriver.chrome.options import Options
from selenium.webdriver.chrome.service import Service
from webdriver_manager.chrome import ChromeDriverManager

from collector.documents import BaseDocument


class BaseCrawler:

    model: BaseDocument

    def extract(self, link: str, **kwargs):
        raise NotImplemented("Needs implementation in subclass.")


class BaseAbstractCrawler(BaseCrawler):

    def __init__(self, scroll_limit: int = 5):
        options = self.set_driver_options()

        self.scroll_limit = scroll_limit
        self.driver = webdriver.Chrome(
            service=Service(ChromeDriverManager().install()), options=options
        )

    def set_driver_options(self) -> Options:
        return Options()

    def login(self):
        pass

    def scroll_page(self):
        """Scroll through the LinkedIn page based on the scroll limit."""
        current_scroll = 0
        last_height = self.driver.execute_script("return document.body.scrollHeight")
        while True:
            self.driver.execute_script(
                "window.scrollTo(0, document.body.scrollHeight);"
            )
            time.sleep(5)
            new_height = self.driver.execute_script("return document.body.scrollHeight")
            if new_height == last_height or (
                self.scroll_limit and current_scroll >= self.scroll_limit
            ):
                break
            last_height = new_height
            current_scroll += 1python
We created separate crawlers for each collection (posts, articles, and repositories): github.py, medium.py, substack.py and linkedin.py.
Every crawler extends the BaseCrawler or BaseAbstractCrawler class, depending on the purpose.
The MediumCrawler, SubstackCrawler and LinkedinCrawler extend the BaseAbstractCrawler (as they depend on the login and scrolling functionality).
Here is what the LinkedInCrawler looks like ↓
import os
import time
from typing import Dict, List

from bs4 import BeautifulSoup
from bs4.element import Tag
from selenium.webdriver.chrome.options import Options
from selenium.webdriver.common.by import By

from config import settings
from crawlers.base import BaseAbstractCrawler
from documents import PostDocument
from errors import ImproperlyConfigured


class LinkedInCrawler(BaseAbstractCrawler):

    model = PostDocument

    def set_driver_options(self) -> Options:
        options = Options()
        options.add_experimental_option("detach", True)
        return options

    def extract(self, link: str, **kwargs):
        print(f"Starting to scrape data for profile: {link}")

    def _scrape_section(self, soup: BeautifulSoup, *args, **kwargs):
        """Scrape a specific section of the LinkedIn profile."""
        # Example: Scrape the 'About' section
        parent_div = soup.find(*args, **kwargs)
        return parent_div.get_text(strip=True) if parent_div else ""

    def _extract_image_urls(self, buttons: List[Tag]) -> Dict[str, str]:
        """
        Extracts image URLs from button elements.

        Args:
            buttons (List[Tag]): A list of BeautifulSoup Tag objects representing buttons.

        Returns:
            Dict[str, str]: A dictionary mapping post indexes to image URLs.
        """

    def _get_page_content(self, url: str) -> BeautifulSoup:
        """Retrieve the page content of a given URL."""

    def _extract_posts(
        self, post_elements: List[Tag], post_images: Dict[str, str]
    ) -> Dict[str, Dict[str, str]]:
        """
        Extracts post texts and combines them with their respective images.

        Args:
            post_elements (List[Tag]): A list of BeautifulSoup Tag objects representing post elements.
            post_images (Dict[str, str]): A dictionary containing image URLs mapped by post index.

        Returns:
            Dict[str, Dict[str, str]]: A dictionary containing post data with text and optional image URL.
        """

    def _scrape_experience(self, profile_url: str):
        """Scrapes the Experience section of the LinkedIn profile."""
        self.driver.get(profile_url + "/details/experience/")

    def _scrape_education(self, profile_url: str) -> str:
        self.driver.get(profile_url + "/details/education/")

    def login(self):
        """Log in to LinkedIn."""
For example, the GitHub crawler is a static crawler that doesn’t need a login function, scroll_page function, or driver. It uses only git commands.
The GithubCrawler extends the BaseCrawler class and uses the extract method to retrieve the desired repository.
import os
import shutil
import subprocess
import tempfile

from crawlers.base import BaseCrawler
from documents import RepositoryDocument


class GithubCrawler(BaseCrawler):

    model = RepositoryDocument

    def __init__(self, ignore=(".git", ".toml", ".lock", ".png")):
        super().__init__()
        self._ignore = ignore

    def extract(self, link: str, **kwargs):
        repo_name = link.rstrip("/").split("/")[-1]

        local_temp = tempfile.mkdtemp()

        try:
            os.chdir(local_temp)
            subprocess.run(["git", "clone", link])

            repo_path = os.path.join(local_temp, os.listdir(local_temp)[0])

            tree = {}
            for root, dirs, files in os.walk(repo_path):
                dir = root.replace(repo_path, "").lstrip("/")
                if dir.startswith(self._ignore):
                    continue

                for file in files:
                    if file.endswith(self._ignore):
                        continue
                    file_path = os.path.join(dir, file)
                    with open(os.path.join(root, file), "r", errors="ignore") as f:
                        tree[file_path] = f.read().replace(" ", "")

            instance = self.model(
                name=repo_name, link=link, content=tree, owner_id=kwargs.get("user")
            )
            instance.save()

        except Exception:
            raise
        finally:
            shutil.rmtree(local_temp)
3. How do you store your data? An ODM approach
Object Document Mapping (ODM) is a technique that maps between an object model in an application and a document database.
By abstracting database interactions through model classes, it simplifies the process of storing and managing data in a document-oriented database like MongoDB. This approach is particularly beneficial in applications where data structures align well with object-oriented programming paradigms.
The documents.py module serves as a foundational framework for interacting with MongoDB.
Our data modeling centers on creating specific document classes — UserDocument, RepositoryDocument, PostDocument, and ArticleDocument — that mirror the structure of our MongoDB collections.
These classes define the schema for each data type we store, such as users’ details, repository metadata, post content, and article information.
By using these classes, we can ensure that the data inserted into our database is consistent, valid, and easily retrievable for further operations.
class BaseDocument(BaseModel):
    id: UUID4 = Field(default_factory=uuid.uuid4)

    model_config = ConfigDict(from_attributes=True, populate_by_name=True)

    @classmethod
    def from_mongo(cls, data: dict):
        """Convert "_id" (str object) into "id" (UUID object)."""


    def to_mongo(self, **kwargs) -> dict:
        """Convert "id" (UUID object) into "_id" (str object)."""


    def save(self, **kwargs):
        collection = _database[self._get_collection_name()]

    @classmethod
    def get_or_create(cls, **filter_options) -> Optional[str]:
        collection = _database[cls._get_collection_name()]


    @classmethod
    def bulk_insert(cls, documents: List, **kwargs) -> Optional[List[str]]:
        collection = _database[cls._get_collection_name()]


    @classmethod
    def _get_collection_name(cls):
        if not hasattr(cls, "Settings") or not hasattr(cls.Settings, "name"):
            raise ImproperlyConfigured(
                "Document should define an Settings configuration class with the name of the collection."
            )

        return cls.Settings.name


class UserDocument(BaseDocument):

    first_name: str
    last_name: str

    class Settings:
        name = "users"


class RepositoryDocument(BaseDocument):

    name: str
    link: str
    content: dict
    owner_id: str = Field(alias="owner_id")

    class Settings:
        name = "repositories"


class PostDocument(BaseDocument):

    platform: str
    content: dict
    author_id: str = Field(alias="author_id")

    class Settings:
        name = "posts"


class ArticleDocument(BaseDocument):

    platform: str
    link: str
    content: dict
    author_id: str = Field(alias="author_id")

    class Settings:
        name = "articles"
In our ODM approach for MongoDB, key CRUD operations are integrated:
- Conversion: The
to_mongomethod transforms model instances into MongoDB-friendly formats. - Inserting: The
savemethod uses PyMongo’sinsert_onefor adding documents, returning MongoDB’s acknowledgment as the inserted ID. - Bulk Operations:
bulk_insertemploysinsert_manyfor adding multiple documents and returning their IDs. - Upserting:
get_or_createeither fetches an existing document or creates a new one, ensuring seamless data updates. - Validation and Transformation: Using Pydantic models, each class ensures data is correctly structured and validated before database entry.
4. Raw data vs features
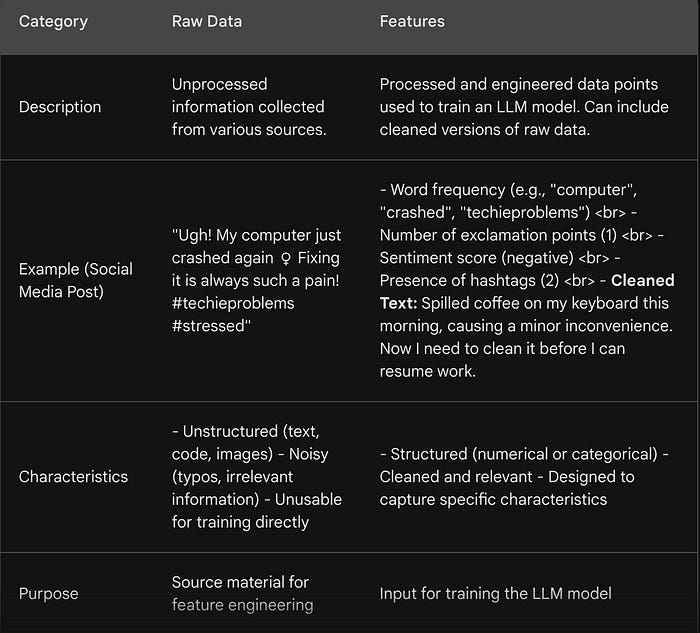
Now that we understand the critical role of data pipelines in preparing raw data let’s explore how we can transform this data into a usable format for our LLM twin. This is where the concept of features comes into play.
Features are the processed building blocks used to fine-tune your LLM twin.
Imagine you’re teaching someone your writing style. You wouldn’t just hand them all your social media posts! Instead, you might point out your frequent use of specific keywords, the types of topics you write about, or the overall sentiment you convey. Features work similarly for your LLM twin.
Raw data, on the other hand, is the unrefined information collected from various sources. Social media posts might contain emojis, irrelevant links, or even typos. This raw data needs cleaning and transformation before it can be used effectively.
In our data flow, raw data is initially captured and stored in MongoDB, which remains unprocessed.
Then, we process this data to create features — key details we use to teach our LLM twin — and keep these in Qdrant. We do this to keep our raw data intact in case we need it again, while Qdrant holds the ready-to-use features for efficient machine learning.
5. Cloud Infrastructure
In this section, we will focus on how to constantly update our database with the most recent data from the 3 data sources.
Before diving into how to build the infrastructure of our data pipeline, I would like to show you how to “think” through the whole process before stepping into the details of AWS.
The first step in doing an infrastructure is to draw a high-level overview of my components.
So, the components of our data pipeline are:
- Linkedin crawler
- Medium crawler
- Github crawler
- Substack crawler
- MongoDB (Data Collector)
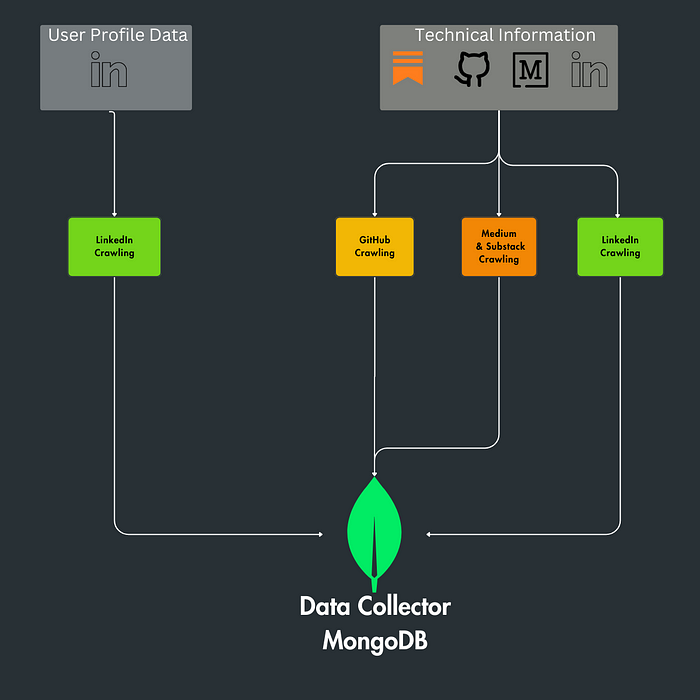
Every crawler is a .py file. Since this data pipeline must be constantly updated, we will design a system based on lambda functions, where every lambda function represents a crawler.
What is a lambda function in the AWS Environment?
AWS Lambda is a serverless computing service that allows you to run code without provisioning or managing servers. It executes your code only when needed and scales automatically, from a few daily requests to thousands per second.
Here’s how Lambda fits within the AWS environment and what makes it particularly powerful:
- Event-Driven: AWS Lambda is designed to use events as triggers. These events could be changes to data in an Amazon S3 bucket, updates to a DynamoDB table, HTTP requests via Amazon API Gateway, or direct invocation via SDKs from other applications. In the diagram I provided, the events would likely be new or updated content on LinkedIn, Medium, or GitHub.
- Scalable: AWS Lambda can run as many instances of the function as needed to respond to the rate of incoming events. This could mean running dozens or even hundreds of cases of your function in parallel.
- Managed Execution Environment: AWS handles all the administration of the underlying infrastructure, including server and operating system maintenance, capacity provisioning and automatic scaling, code monitoring, and logging. This allows you to focus on your code.
How can we put the medium crawler on an AWS Lambda function?
We need a handler.
The handler function is the entry point for the AWS Lambda function. In AWS Lambda, the handler function is invoked when an event triggers the Lambda function.
In the next section, I will show how this handler will be used to deploy this function on AWS Lambda.
from aws_lambda_powertools import Logger
from aws_lambda_powertools.utilities.typing import LambdaContext

from crawlers import MediumCrawler, LinkedInCrawler, GithubCrawler
from dispatcher import CrawlerDispatcher
from documents import UserDocument

logger = Logger(service="decodingml/crawler")

_dispatcher = CrawlerDispatcher()
_dispatcher.register("medium", MediumCrawler)
_dispatcher.register("linkedin", LinkedInCrawler)
_dispatcher.register("github", GithubCrawler)


def handler(event, context: LambdaContext):

    first_name, last_name = event.get('user').split(" ")
    user = UserDocument.get_or_create(first_name=first_name, last_name=last_name)

    link = event.get('link')
    crawler = _dispatcher.get_crawler(link)

    try:
        crawler.extract(link=link, user=user)

        return {"statusCode": 200, "body": "Articles processed successfully"}
    except Exception as e:
        return {"statusCode": 500, "body": f"An error occurred: {str(e)}"
After you define what it means to transform your Python script into a valid AWS Lambda function, the next phase is to draw the diagram to understand the data flow and how the system will be triggered.
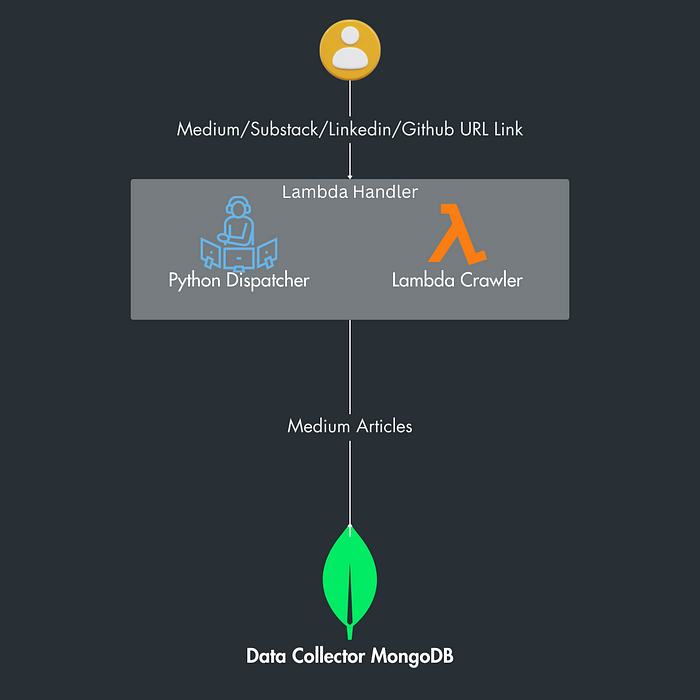
Each crawler function is tailored to its data source: fetching posts from LinkedIn, articles from Medium & Substack, and repository data from GitHub.
In order to trigger the lambda function, we have created a python dispatcher which is responsible to manage the crawlers for specific domains.
You can register crawlers for different domains and then use the get_crawler method to get the appropriate crawler for a given URL.
import re

from crawlers.base import BaseCrawler


class CrawlerDispatcher:

    def __init__(self):
        self._crawlers = {}

    def register(self, domain: str, crawler: BaseCrawler):
        self._crawlers[r"https://(www\.)?{}.com/*".format(re.escape(domain))] = crawler

    def get_crawler(self, url: str) -> BaseCrawler:
        for pattern, crawler in self._crawlers.items():
            if re.match(pattern, url):
                return crawler()
        else:
            raise ValueError("No crawler found for the provided link")
The lambda function can be triggered by invoking the function with a link payload.
aws lambda invoke \
  --function-name crawler \
  --cli-binary-format raw-in-base64-out \
  --payload '{"user": "Paul Iuztin", "link": "https://github.com/iusztinpaul/hands-on-llms"}' \
  response.json
The responsible crawler process its respective data and then pass it to the central Data Collector MongoDB.
The MongoDB component acts as a unified data store, collecting and managing the data harvested by the lambda functions.
This infrastructure is designed for efficient and scalable data extraction, transformation, and loading (ETL) from diverse sources into a single database.
6. Wrap-up — Run everything
Cloud Deployment with GitHub Actions and AWS
In this final phase, we’ve established a streamlined deployment process using GitHub Actions. This setup automates the build and deployment of our entire system into AWS.
It’s a hands-off, efficient approach ensuring that every push to our .github folder triggers the necessary actions to maintain your system in the cloud.
You can delve into the specifics of our infrastructure-as-code (IaC) practices, particularly our use of Pulumi, in the ops folder within our GitHub repository.
This is a real-world example of modern DevOps practices, offering a peek into industry-standard methods for deploying and managing cloud infrastructure.
Local Testing and Running Options
For those preferring a more hands-on approach or wishing to avoid cloud costs, we provide another alternative.
A detailed Makefile is included in our course materials, allowing you to effortlessly configure and run the entire data pipeline locally.
It’s especially useful for testing changes in a controlled environment or for those just starting with cloud services.
For an in-depth explanation and step-by-step instructions, please refer to the README in the GitHub repository.
Conclusion
This is the 2nd article of the LLM Twin: Building Your Production-Ready AI Replica free course.
In this lesson, we presented how to build a data pipeline and why it’s so important in an ML project:
🔻 Data collection process -> Medium, Github, Substack & Linkedin crawlers
🔻 ETL pipelines -> data is cleaned and normalized
🔻 ODM (Object Document Mapping ) -> a technique that maps between an object model in an application and a document database
🔻 NoSQL Database (MongoDB) & CDC (Change Data Capture) pattern
- Tracks data changes log them, and queues messages for real-time system updates
- The clean data is stored in a NoSQL database
🔻 Feature Pipeline
- A streaming ingestion pipeline is part of the feature pipeline that processes Articles, Posts, and Code.
- Tools like Bytewax and Superlinked are used, likely for further data processing and transformation.
- This processed data is then queued in RabbitMQ, a message broker that helps in asynchronous processing and communication between different services.
After we went into the details of how to build data crawlers for different collections like: user articles, github repositories and user social media posts.
Ultimately, we went through the process of how to think and prepare your code for AWS by deploying it on lambda functions.
In Lesson 3, we will dive deeper into the CDC(change data capture) pattern and explain why it’s a crucial component in any machine learning project, where data is involved.
🔗 Check out the code on GitHub [1] and support us with a ⭐️
References
[1] Your LLM Twin Course — GitHub Repository (2024), Decoding ML GitHub Organization

